Wednesday 27 February 2013

Lindisfarne Stones: goldwork felt pieces


Well done anyone who guessed that I would be making this in goldwork!

I'll be covering the entire design in gold, with the grid pattern picked out in red.  I'll be using imitation Japanese gold thread no. 8, couched down with coloured thread.

First things first, though - I need to get the design onto fabric to stitch.  Couched gold thread works best over felt, so I made a transfer of the design (reversed, so that when used it would come out the right way), and ironed it onto yellow felt:


This is the first time I've tried to use a transfer on felt, and I'm reasonably pleased with the results: a bit patchy in spots, but not too bad overall.

I then cut out the felt shapes:


And stitched them onto a slightly wonky piece of yellow-dyed linen, stretched on a frame:


I'd attempted to go over some of the paler transfer with various pencils and red ink, hence the splodges down the bottom of the top piece, but it was just making things worse, so I gave it up.  I'll just have to try and be careful when I come to stitch it!

Tuesday 19 February 2013

Lindisfarne Stones


I am going to embroider my carved stone dogs.  Not a separate embroidery using the same design, I mean the actual carving. I keep getting blank looks when I say this to people, but I think it could work!

It is possible to stitch stone - I have a very small piece by Clyde Olliver which has stitches worked through holes drilled in slate - but I don't want to do anything else that will affect my carving (if only because it would be too hard!).  This leaves embroidering around it in some way.

What I intend doing is effectively constructing a box around it, with the carving framed by the top.  Keeping on the Lindisfarne Gospels theme, I want to use a motif from there, though after all the zoomorphic designs, this time I want to use a regular key pattern.  These are used in the Gospels and in other items such as stone crosses of the same period, and so seem appropriate.

The key pattern I want to use is drawn on a diamond grid, and although I could draw up such a grid myself, I'm afraid I'm going to cheat slightly and draw it on squared paper.

I first drew a strip up the centre, as it seemed easier than trying to work out the edges first:


Then filled in the rest:


I still want the diamond-grid effect, so this is where the real cheating comes in: I scanned my hand-drawn grid, rotated the scanned image by 45 degrees, and squashed it slightly, so that it's wider than it is tall. This gives me the key pattern I was after:


I traced this onto strips, to form the design for the sides of the box:


To get the outline shape, I placed the stone piece under a sheet of perspex propped on books, and some tracing paper on top, and traced the outline:


I then traced the key pattern onto the same design:


Here's the completed design for the top:


I know what technique I'm going to use to stitch this - can you guess?

Thursday 14 February 2013

Carved stone dogs - a bit more work


Having got my carved stone dogs finished off, I noticed the same thing as I did when I first did Wow: unless the light is on it just right, to cast a shadow, the design can all but disappear. So, I decided to do the same thing as I did then: paint it.

As before, I primed the surface of the stone with a sealer meant for stone tiles - it's colourless and matt, and so doesn't show up at all, but will stop the paint from sinking into the stone.  I then applied a layer of gesso to the areas to be painted:


As you can see, that's all the carved areas; the intention is to leave the uncarved design as the natural stone.

I'm using the same light gold acrylic paint as for Wow (well I like gold!), and did the fiddly bits in the centre first, with a fine brush:


Then the outline of the dogs:


Then finished off the rest of the background:


It looks quite yellow in the photo, though in real life it does have a proper shine to it.

The design certainly stands out better now!


I think this might turn into embroidery...

Friday 8 February 2013

Lindisfarne Beasts: completed


The embroidery was already finished, but to finish the piece I needed to do a few more final bits and pieces.

I first damp stretched it, to get it nice and wrinkle-free:


I've had a frame in mind for this from that start, and had made sure that the piece of linen I was using for the embroidery was the right size to fit.  I retrieved it from the cupboard, and got it ready:


Using the mount board that came with the frame, I pinned the fabric in place:


and mitred the corners:


And then laced the back tightly:


Here it is from the front, nicely stretched:


And finally, in the frame, on display:


Finished!

I'm going to enter it for the the Embroiderers' Guild exhibition in Durham Cathedral later this year - I'll let you know whether it's accepted.

Sunday 3 February 2013

Stone carving workshop - decorative motifs


You may remember that last summer I went on a stone carving workshop, at the Mushroom Works in Newcastle.  I did lettering carving then, and was very pleased with the result, 'Wow'.  I've just been on a second workshop at the same place, this time on decorative motifs.

The course was run by the same tutor, Peter Graham, and followed much the same format.

Peter had standard images we could use if we wanted, but we were encouraged to bring designs of our own to use.  Being quite keen on all things Lindisfarne Gospels at the moment, I selected a motif from that, featuring dogs again.  Unfortunately, I'd drawn it up for a piece of stone about the same size as Wow, but the stone provided this time was bigger, which meant hurriedly redrawing it.  Plus, Peter advised me to simplify it a bit, to make it easier for a beginner like me.

Here's the original design and the redrawn version:


I traced this onto the stone using carbon paper:


The first thing I needed to do was to carve out the outline of the design:


And the outline of the fiddly bits in the centre, though not the mouths and eyes, which were too fiddly to attempt just yet:


I took out the rest of the fiddly bits:


And then, using a claw chisel, started removing all the stone around the main design:


This was hard work and took ages, though at least I could sit down - it was done with the stone fastened to the table with a clamp, to stop it moving about, at least as much.

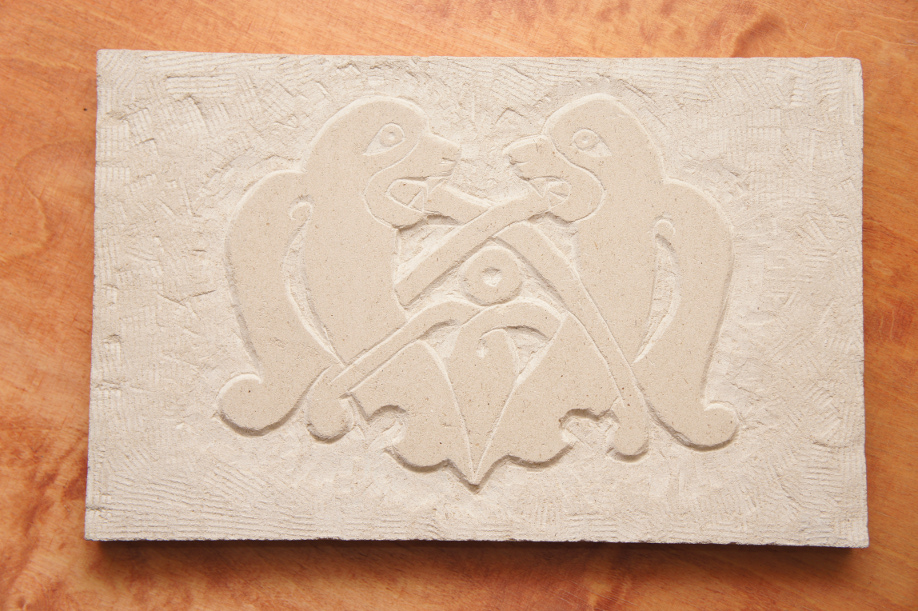
But I got there in the end!


I rather like the textured effect of the claw chisel, though as I didn't have time to work on a smooth finish, that's just as well.

I then, and almost finally, I needed to add the detail - the places where the dogs' tongues overlap, ears and teeth and so forth:


After that, it was a case of improving what I already had: deepening the cut around the design to make it stand out better, and neatening stuff up.


It would have been nice to round it off a bit so there wasn't quite such a severe edge, but I ran out of time.

I'm slightly ambivalent about it; I don't think it's come out as well as Wow, but there was a lot more to do in not much time, and I am a complete novice after all.  It improved a lot after a good clean-up once I got it home - a scrub with very fine wet and dry sandpaper and water:


Freshly spruced up, in the winter sunshine:


What do you think?