Sunday 30 November 2014

Silver snowdrop sample - the snowdrops

Another ghastly photo, but hopefully you can more or less tell that I've finished the satin stitch for the upper leaves and  around the edge of the snowdrops:


That's all the embroidery done - now to cut it out...

Thursday 27 November 2014

Silver snowdrop sample - satin stitch

To hold the silver mesh in place, I'm stitching over it in sating stitch around the edge; the double row of split stitch forms the extent of the satin stitch, leaving as much of the mesh exposed as possible.

The roots first:


Stems and most of the leaves:


The large single leaf:


My stitching looks terrible in the photo - the light seem to catch everything and makes it look much worse than it does in reality.  Or I think so, anyway - you'll just have to believe me!

I'll do the snowdrops themselves next.

Sunday 23 November 2014

Silver snowdrop sample - outline

A short post for a fair amount of sewing: using split stitch, I've worked a double row of stitches around the outline of the design, and just inside it:


I want the silver mesh to form the design and so be as visible as possible, but it also needs to be held firmly in place so stitching is needed, so a compromise is needed.  Now the outline is done, I can do the proper stitching next.

Wednesday 19 November 2014

Silver snowdrop sample - Italian tubular mesh wire ribbon

As I mentioned before, the point of this sample is to try something using the Italian tubular mesh wire ribbon (henceforth referred to as 'mesh' as it's a lot easier).

Here's the design on the fabric, stretched on a frame:


The design is clearly far too fiddly to try and apply the mesh to it, so I'm going to try the opposite: use the mesh as a background and stitch over it.

Here's the mesh itself in silver, and the thread I'll be using:


Just the one colour, Madeira stranded cotton no. 1708, a silver-blue.

I cut a length of the mesh, slit it down one side to make double the width of the ribbon, and stretched it out as far as it could reasonably go.  And then did it again as just the one thickness looked a bit thin.  I then placed both of these one on top of the other over the painted design, and pinned it in place:


Next time, I'll start stitching over it.

Monday 17 November 2014

Silver snowdrop sample

Another sample piece.  You may remember that earlier this year when working on the Apple Tree fire screen I had a go at using Italian tubular mesh wire ribbon but it didn't work at all and I took it off.

This was the right thing to do for that particular project, but it's been at the back of my mind since that there must be something else I could do with it.  This sample piece is an attempt to do just that, so we'll see how it works this time!

The design first.  I'm using a slightly adapted version of a Victorian snowdrop motif I found on the British Library's Flickr site, which is well worth a browse if you have a few days to spare - it's a terrific time sink!  It's also a marvellous resource for out-of-copyright images, so well worth checking out.

Anyway, the snowdrop:


I traced this onto some silver organza:


I've been experimenting with pens, and have opted for ultra-fine Sharpies: they have a very fine nib, they come in lots of colours, and - very importantly for this - they're colour fast and so won't run when I paint over them.  As you can see, I've used a mid-blue for this.

The traced outline:


And painted over with acrylic paint thinned down with water:


It looks grey in the photo, but is silver in real life. It's still stuck to the paper the fabric is pinned to there; it'll be a lot paler once it's removed.

Ready to start sewing!

Sunday 16 November 2014

Hello to new readers!

If you're new to this blog and have followed a link here from Mary Corbet's site, then a big hello, and I hope you'll keep on reading.

If you did come here from Needle 'n Thread then you've probably already seen the Apple Tree fire screen:


but you might also be interested in some of my other work.

The highest-profile commission I've had was for a processional banner for Durham Cathedral, in England, St Cuthbert's Banner:


There's a BBC News video about that, too!

I've done quite a lot of goldwork over the years, including in 3D, such as the Dragon:


And colour shading, such as the little landscape on this book slipcase:


Or another landscape, of Gibside Chapel, here:


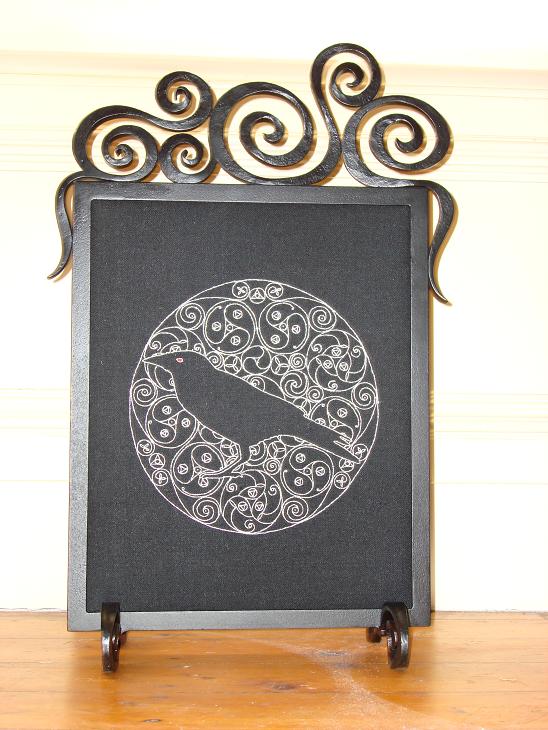
I'm also very interested in Celtic designs, such as this fire screen:


My current work is more with shading, such as the Apple Tree we started this post with, but one of the many wonderful things about embroidery is that there's always something new to try, so who knows what I'll end up doing!

It's always great to hear from readers, and I do work to sell and to commission, so if there's something you're interested in, please get in touch.


Thursday 13 November 2014

Acanthus leaf sample - completed

As this is just a sample piece I'm not making it up into anything, but I still want to finish it off nicely and put it on a background.  The first step towards that is to paint diluted PVA glue on the back:


It's still damp there so the colours look a little darker.

Once that had dried properly I then cut it out, which was a bit fiddly but OK:


I should say that the glue on the back is strong enough to hold the stitching together, but thin enough for the the embroidery to still be flexible; it's not at all stiff.

I then applied this to a cream silk satin background, then added a plain backing, just to cover the stitches and make it look neat:


Finished!

I like it - I'm pleased with how it's turned out.

Sunday 9 November 2014

Acanthus leaf sample - embroidery finished

All the filling in done!

Half the second half:


And the remainder:


That's all the embroidery, so next it needs to be cut out and applied to a background.

Wednesday 5 November 2014

Acanthus leaf sample - more filling in

Still filling in!

All the left-hand half done:


That's half of it done, and I think it's working quite nicely.

Sunday 2 November 2014

Acanthus leaf sample - starting to fill in

With the shading done, I can start to fill in the rest, using two strands of the palest shade, 1908.

Here's one leaf done (and photographed against a dark background, to make it stand out a bit better):


And the rest of that section:


There's still a way to go, but I'm happy with how it's looking.