I'm making rather slow progress on my new project, mostly because I'm not putting anything like as much work into it as I did the Banner. It's rather nice having a few evenings off! I am making some progress though, as you'll see.
In my attempt to do something as unlike the Banner as possible, I'm going to add some beading.
This is completely free, with no attempt at a pattern or overall design, other than more or less pointing in the same direction:
As you can see, it's just random, with bugle beads and seed beads in the same iridescent blue, and silver seed beads too, over the top of the free machine stitching.
The iridescent beads are very pretty, with quite a bit of variation in the colours:
There's quite an area to cover, with all the sections of the shell shape, so I could be on with this for some time!
Friday, 27 January 2012
Friday, 20 January 2012
A big day for the Banner
The biggest day of all will be its dedication at Durham Cathedral on 20 March, but yesterday was the biggest so far. For the first time, all the parts of the Banner - the Banner itself, the silver bells, and the carrying pole with its mounts and fittings plus a harness to be worn by the carrier - were brought together.
This took place at Fashion and Design building at Northumbria University, which was a nice light spot for it. Several members of the Northumbrian Association committee, the other craftspeople involved and a few journalists were there.
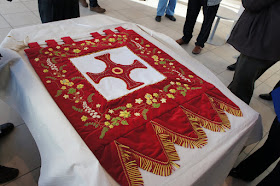
The Banner was taken out of its calico dust sheet, the first time most people there had seen it:
The silver bells, made by Les Howe, were attached to the bottom:
It was then hung on the pole, made by Trevor Duncan - first the cross-piece:
Then the vertical pole:
You can see how the two parts fit together here:
The finial in the shape of St Cuthbert's cross was added to the top:
It was carefully picked up:
And carried outside, where the project's sponsor, John Cuthbert, already wearing the harness made by Ian Corrigan, got ready to carry it:
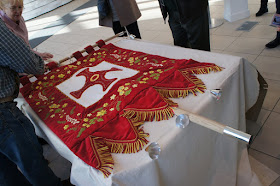
From the back, you can see how the pole fits through the loops on the back of the Banner, stopping it from flapping about:
It was a bit breezy, so I was glad I'd added them!
And here it is, as it was meant to be seen:
I have to say I was thrilled with how well it looked (and a bit relieved, if I'm honest), and everyone else seemed to be very happy with it too.
I was interviewed by several journalists, and pieces on the day appeared today in the Newcastle Journal, the Northern Echo, and the Sunderland Echo. It was all quite an experience!
Monday, 16 January 2012
And the winner is...
...going to be announced in a moment. Before then, I'd just like to thank everyone who took the trouble to comment or email me with an answer, and everyone who has commented or emailed or read the blog ever. Your encouragement and support means a lot.
So, to recap, the competition was to guess how many hours St Cuthbert's Banner took to complete, and the prize was an extra Banner flower, mounted on some of the velvet I used for it:
The correct answer was...
802.5 hours
A lot of the answers were much higher than that, which made me think I ought to have put more work into it!
There was one answer that was very close indeed, with an estimate of 800 hours, so I am happy to announce the winner is songbirdgifts.
Congratulations SongBird! Email me with your postal address, and I'll send the flower to you as soon as possible.
Thanks again everyone!
Saturday, 14 January 2012
Machining the shapes
Now I'd proved to my own staisfaction that this 'shell' idea should work, I cut out the same shapes in felt (though missing out the biggest one this time):
For each one, I sandwiched it between a layer of cotton lawn, which will form the back and won't be seen, and a light blue silk dupion, that I already had in the cupboard:
I'm trying to do this project from stock, as it were, and not buy anything specially for it. It'd probably be good to try and get some of my stash used up!
I stitched around the edge in small running stiches, just to hold it in place:
Then free machine stitched over the running stitches in a very close together zig-zag in a matching blue:
That's not terribly well done, I'm afraid. I'm pretty out of practice for free machine embroidery, but never mind - the whole point of this project is to do something as utterly unlike the Banner as I can think of, so a more casual approach is good. Or that's what I'm trying to tell myself, anyway!
Here's all of them done, still in their hoops, apart from one, as I only have two 12" hoops and would need three for this, so one had to be swapped over:
This was fun! I used a free machine vermicelli stitch to fill in the shapes, trying not to make any points of overlaps:
I didn't entirely succeed, though I did enjoy myself!
All vermicellied:
I then stitched quite a lot more heavily over the top with a metallic silver thread:
That hasn't come out as clearly as I'd have liked in the photo, but it looks quite sparkly in real life.
Next, beads.
Sunday, 8 January 2012
What's next?
(Just a quick reminder - there are still a few days left to run on the competition, so if you haven't already done so, get your answer in now to win a St Cuthbet's Banner flower!)
As I got close to finishing the Banner, several people asked me the same question: what would I be working on next? And the answer? I had no idea! I was so focussed on the Banner that I didn't think at all about what I would do when it was finished, which is unusual for me as I normally have all sorts of ideas in mind, more that I would even have time to do.
But not this time, so once the Banner was handed over I was at a bit of a loose end. It was timed rather nicely with the holidays, so I had a lovely break doing no sewing whatsoever, but now it's time to have a go at something new.
But what? It'd be nice to do something quite unlike what I've been working for ages, so if the Banner was flat, in reds, yellows and greens, all hand-sewn, very detailed, and worked to a precise design, the complete opposite would be 3D, blue and silver, machine embroidery, and free-form. So that's what I'm going to do!
After a bit of thought, I've decided do something inspired by a Nautilus shell, though in sections, to make the construction easier.
To get the proportions, I drew a basic spiral, and measured each section:
The small sections were too small, so I doubled all the lengths.
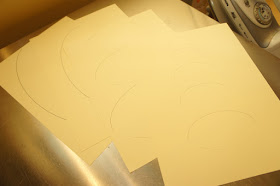
To make sure this actually worked before going too far, I decided to make a mock-up in paper first. I drew a curved shape that will form each section of the final piece, scanned it, and used my computer to resize it to produce a series of shapes with a width of the doubled measurements from the spiral:
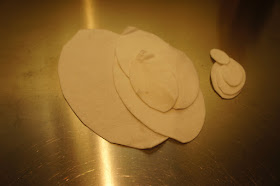
I cut these out:
Then one at a time, bent these round, stuck them together with masking tape, and attached each one to the one before:
Here it is with all the paper sections stuck together:
I think that proves the concept, though the final section is too big - when I start on the stitched version, I'll leave that off.
Monday, 2 January 2012
Competition: win a St Cuthbert's Banner flower
Happy New Year, everyone! To get the year off to a good start and to celebrate finishing St Cuthbert's Banner, I'm running a competition, where you can win a Banner commemorative piece.
Here's the prize:
Anyone who's followed things this far will recognise this as a wood aven flower and leaf, exactly the same as the ones on the Banner itself, and on a piece of the same velvet.
As I worked on the Banner I recorded all the time I spent on it, and added it all up at the end. So, to enter the competition, all you need to do is estimate the number of hours it took to complete. The person who gets the closest wins, or in the event of a tie, one of the tying entries will be drawn at random. To give you all plenty of time, the competition closes on Sunday 15 January, and I'll announce the winner the following day.
You can either leave your answer in the comments below, or if you'd prefer, email me at info@rutholearytextileart.co.uk. Please do not leave any contact details at this stage - I'll be in touch with the winner after the competition closes to ask for them then.
Good luck!


