If you've seen the design you'll know that I have an awful lot of flowers to embroider. I intend to stitch all of them using the same basic techniques, however. This should give a unified look and feel to the whole piece, and makes the design itself the focus. Plus, while this is a contemporary interpretation of the Banner, I'm still keen to keep links to the medieval original, by using techniques familiar to the embroiderers of opus anglicanum work centuries ago.
Opus anglicanum embroideries tend to use a limited repertoire of stitches and techniques, but use them very well - a lesson to us all, I think! Goldwork was used extensively, for backgrounds and embellishment, and fine detail was done in split stitch. This is what I'll be doing too.
So, I'm afraid you're not going to be seeing much variation in technique over the next few months, or any elaborate new stitches, but I hope that seeing the project develop will be interesting in itself.
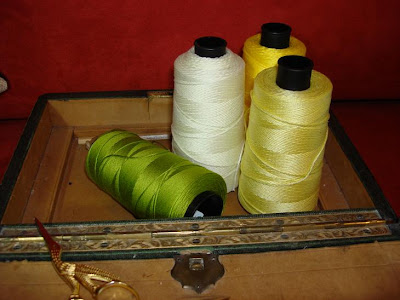
Time to begin! The client preferred cotton velvet for the banner, so I've chosen to work the flowers in cotton too, for consistency. I always prefer to use Madeira stranded cottons - I've used them for years and have always found them to be excellent quality - so I selected a range of yellows and greens to use as a palette. Each of the flowers and leaves will be worked with a limited number of shades chosen from these. Here are the ones for the first of the flowers:
The green is number 1410 on the shade card, and the yellows, from the palest to the darkest, are 0101, 0103 and 0104. I've got one big reel of each shade; I'm going to need quite a bit of each colour, but exactly how much of each was something of a guess. It worried me slightly that if I underestimated and needed to buy some more of a colour, if it was from a different batch the colour might vary a little. It would probably be barely noticeable, but all the same, I don't want to take any chances on this project, so it seemed safest to go for the reels. Of course, if I use all of one of them and have to buy more then I've got exactly the same issue, but hopefully I won't need to.
As I mentioned in a previous post, all the flowers and leaves are going to be worked separately on linen, then cut out and applied to the velvet. This means that the edges need to be secure, to prevent any fraying. I don't want to chemically treat the linen or use Bondaweb or a similar iron-on backing, so I need to go down the old-fashioned route: buttonhole stitch. Buttonhole stitch, or blanket stitch if you prefer, is designed to bind the edge of a fabric so it can be cut, and is used a lot in various cutwork techniques.
Starting with the green bit on the base of the flower that will attached to the stem (apologies for my complete lack of botanical knowledge! I'm sure there's a technical term for this but I have no idea what it is), I worked buttonhole stitch around the edges that will later be cut. Here it is partly done:
And all the way round:
The 'legs' of the buttonhole stitch aren't going to be seen, as the next step is to fill in the whole of this section with split stitch, including over all of the buttonhole stitch apart from the very top, which is left to form a nicely defined edge:
And finally all of the flowers on this section with their green bits done:
The petals are going to be worked in exactly the same way; I did the green bits first, so that the petals can overlap them and give a sense of depth.
Subscribe to:
Post Comments (Atom)


I have begun to be absolutely fascinated by this whole project and am reading with interest your posts about your progress.
ReplyDeleteI also now know what a perfect buttonhole stitch should look like!
:-)
I'm going to try this method out today. I have used split stitch around the outline of leaves in the past and then filled them in with long and short stitch.
ReplyDeleteHave you any tips on helping to get my satin stitch to lay more evenly and flat?
Many thanks for sharing...loving this project.
Alison.