... but I've got the builders in.
Keeping the house more or less clean is enough of a challenge right now without risking any embroidery, so I'm not going to have much to report for a few weeks. I'll post if and when I can, and look forward to having a lovely new kitchen!
Wednesday, 29 May 2013
Friday, 24 May 2013
Lindisfarne Stones: the finished piece
I only just got Lindisfarne Stones finished in time, and it's now been handed over for the exhibition in Durham Cathedral, but I took a few photos of it before it went.

Next to the gold, the pale carved stone looks almost luminous:

And the gold stitching sparkles in the light:

I'm very much looking forward to seeing it in the Cathedral - I'll let you know how it goes!
Sunday, 19 May 2013
Lindisfarne Stones: assembly
With all the stitched sections finished, it's time to put it all together.
I cut pieces of mount board, to form the 'box':

The top of the box needs to have a hole cut in it to frame the carved stone; to do this, I first traced the shape and stuck it to one of the larger pieces of mount board:

I roughly cut as much of the central section away as I could, then cut slits up to the line, and very carefully cut away each section:

You can see I've made a start round the left dog's nose.
Fully cut:

And tidied up a bit:

The stitched panels were cut out, leaving a margin:

The side panels were attached to the board sections, and stitched together at the sides. I have to confess: I used PVA glue to attached the margins (not the stitched area) to the board. I know from past experience that trying to lace skinny and awkward shapes is next to impossible, so I decided at the start that I'd glue them.

There was a problem, though - the heavy stitching had drawn the felt shapes I was stitching over in a bit. These felt shapes had been cut exactly to size, so this meant that they were now slightly too small. Just a couple of millimetres, but enough to be obvious. If I was making a box I'd just have made it slightly smaller, but that wasn't an option here as they're a snug fit around the stone anyway, so some way of disguising the seam was needed.
Red ribbon!
The sides slotted over the stone very nicely:

The base was covered with red velvet, and ladder stitched to the sides:

Here's a last look at the top of the stonework, sitting in its box:

And with the top, attached to the cut board, added, leaving the carved design showing through:

More red ribbon covering the seams:

And finished!

I'll take some photos in better light, to show it off.
Thursday, 16 May 2013
Lindisfarne Stones: a note on the design
Before I get onto the assembly of the final piece, I wanted to point something out about the design. It is of course a grid pattern, based on one used in the Lindisfarne Gospels and on contemporary stone crosses. On the top of the piece, I did my best to keep this as accurate as possible, conforming to the grid closely:

However, I didn't want the sides to be that formal. Unusually for me, as I usually have things very precisely planned before I start work, I wasn't quite sure what I wanted to do, and changed my mind at the last moment.
Initially, when I was drawing up the designs, I'd pictured the sides with the same grid, but less of it:

I wasn't happy with this, though - it didn't cover the area as I wanted - so I redrew it using the grid to cover all the space:

Even this wasn't quite right, though. When I started work I realised that what I wanted was the same grid, but loose, as though it was falling apart. Drawing a deliberately 'loose' grid and sticking to it rigidly seemed to be missing the point, however, so I marked up the background with the design, and then as I stitched deliberately didn't stick to it, but just used it as a guide to the overall pattern. This felt an odd thing to do, and wasn't as easy as it sounds, believe me!
It did however give me the effect I wanted:

You can see that the angles are slightly off and things don't quite align: the grid, but not quite the grid. The intention is that when it's assembled, the grid will fall over the edge and start to break down. We'll see how well that works as I put it together!
Wednesday, 15 May 2013
100% silk velvet
A quick post to ask for help: can anyone recommend a supplier of 100% silk velvet (i.e. not silk/rayon mix)? Ideally I'd like a supplier in the UK, but someone who can ship here would be fine too.
This is with an eye on a future project which may or may not happen, but it would be good to know regardless!
This is with an eye on a future project which may or may not happen, but it would be good to know regardless!
Saturday, 11 May 2013
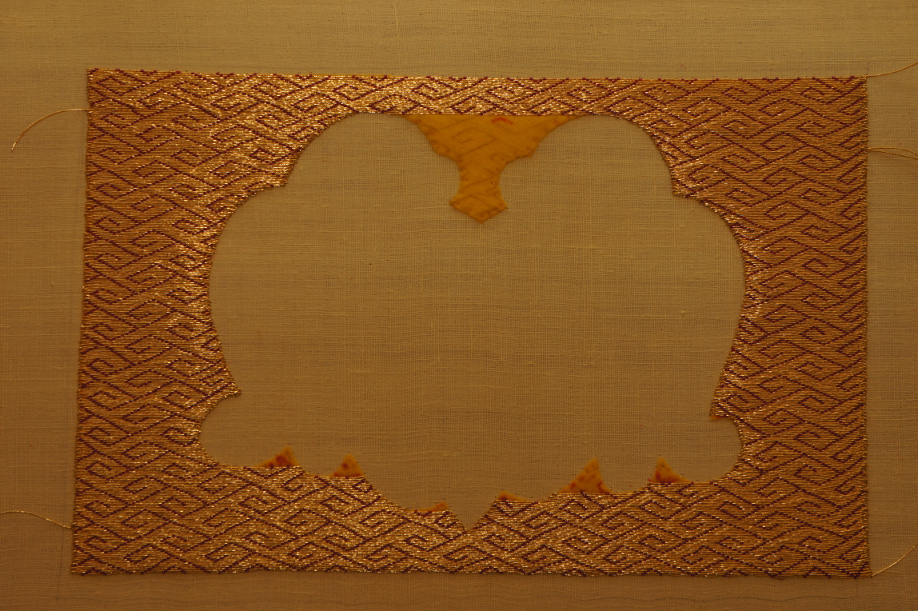
Lindisfarne Stones: pointy bits
Just the last little bits of sewing to do on it now, with the various pointy bits that were left behind to finish off.
First (and with apologies for the rather murky photos throughout), the bits on the left:

And then on the right:

And finally the section between the dogs' faces:

Then neatened up, with all the ends taken through to the back and fastened off:

Finished! Well, the sewing, anyway. I now have to assemble the piece and incorporate the stonework.
Sunday, 5 May 2013
Lindisfarne Stones: left hand side (continued)
Very nearly there now! I've been putting in the hours and have finished the left had side.
Here's part of it, to the top of the dog's ear:

And the rest, joining up with the strip along the top:
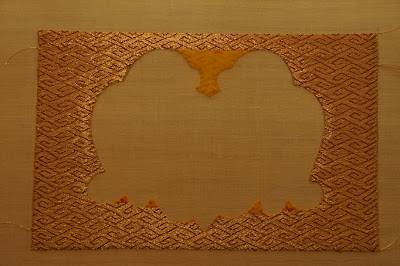
It seems to be catching the light slightly differently in the photo - I suppose I must have been stitching at a slightly different angle or something. It looks OK in real life, anyway.
Just the pointy bits to do now, then the sewing is finished.
Here's part of it, to the top of the dog's ear:

And the rest, joining up with the strip along the top:
It seems to be catching the light slightly differently in the photo - I suppose I must have been stitching at a slightly different angle or something. It looks OK in real life, anyway.
Just the pointy bits to do now, then the sewing is finished.
Subscribe to:
Posts (Atom)


