Friday 23 December 2011

St Cuthbert's Banner - presenting it to the Northumbrian Association

With the Banner completed, it was time to say goodbye to it, and hand it over to the client, the Northumbrian Association.

Marion Bridgewood, the Association's Vice-Chairman and the person who's arranged and coordinated the entire Banner project (I'm not the only person involved, by any means), and John Danby, the Chairman, came to collect it:


I'm pleased and relieved to say that they were very happy with it!

The Association commissioned the Banner for presentation to Durham Cathedral; it'll now be taken to the Cathedral for safe keeping, until it's dedicated on St Cuthbert's Day, 20 March 2012. All being well, after that it'll be on display in the Cathedral itself, but I think discussions are still going on about the arrangements.

In January, all the project team, plus members of the Association, the Banner's sponsor, and representatives of the Cathedral will get together to put the Banner, the carrying pole, and the silver bells and fittings together for the first time - I can't wait to see it!

I'm going to have a completely sewing-free break for a few days, but I'll return in the New Year with a special competition to celebrate finishing my work on the Banner, so look out for that.

Before then, have a fantastic festive season, whatever you celebrate, and however you celebrate it.  See you next year!

Thursday 22 December 2011

The front, fringing - and finished!

This is a very exciting day - after months of work, the Banner is finally finished.  Yes, it is, at last, completed.  It's been a long haul, but I got there in the end.

There's still a bit of work to bring you up to date on first, though.  The front of the Banner needed to be attached, firstly by stitching the seams to the canvas interlining, same as for the back:


Here, the front is now stitched to the interlining, but as you can't see any of the stitches on the front (I was very careful about that!), you'll just have to take my word for it:


The edges were folded under and pinned, ready to be ladder stitched in place:


I was so excited at being almost finished that I forgot to take a photo of the front stitched into place, but went straight onto adding the fringe along the bottom.  This is a red and yellow bullion fringe, again woven specially to match the Banner's colours.

As this was the last thing to do, once this was on, the Banner was, incredibly, finished:

Wow.

Let's all savour the moment, and take another look, in better light and held up rather that lying flat.  First, the back:


And the front:


It looks better held up as its own weight pulls it straight; once it's suspended from the pole along the top rather than just held at the corners, that slight bagginess on the top section will disappear.

I've been rushing to get it finished as members of the Northumbrian Association - the client - are collecting it before Christmas, and taking it to the Cathedral for safe keeping.

You know, I have to admit, I'm really pretty pleased with how it's turned out!  What do you think?

To celebrate the Banner's completion, I'm going to make a Banner-related giveaway for a blog competition.  More details soon!

Wednesday 21 December 2011

The points along the bottom

In the desciption of the lost Medieval banner in the Rites of Durham, the banner is described as "five quarters [of a yard] deep", with a red and gold fringe and silver bells along the bottom.  Fiona, the designer, used the size, along with the rest of the description, to produce a basically square banner, with deep points 9" (a quarter of a yard; 23cm) long, from which bells will hang.  It's these I'm doing next.

There are three full points, and two "half" points, one at each end. This means eight pieces of fabric lined and edged:


The silversmith making the bells provided three jump rings - I'll let him explain why:


I don't want to hang the bells from the fringe, but they need to hang at the level of the fringe, so I threaded them onto loops of ribbon, knotted to stop them falling off and getting lost before they were sewn in:


The half points were folded over, tacked, and the line to be machine stitched was marked on:


And the full points too:


If you look closely, you can see the end of the ribbon poking out of the bottom.

These were machine stitched, with an extra line of stitching across the bottom, to make sure that the ribbon with the jump ring was secure:


And all turned right side out:


The points aren't as pointy as I might have liked, but once the fringe is on it shouldn't matter, and you can see the ribbon loops and jump rings for the bells quite clearly.

When attaching them to the Banner itself, to get the spacing right, I tacked the half points in place at the edges first, then one of the full points in the centre, aided by the usual tailor's chalk marks:


With the other two points added, they were all back stitched in place with upholstery thread, and herringbone stitched along the top:


Then, as with the tabs along the top, I ladder stitched the fronts of the points to the main panel:


That's the back of the Banner finished.  In fact, it's very very nearly finished all the way together...

Tuesday 20 December 2011

The tabs along the top

The Banner will be carried on a T-shaped pole arrangement, with the carrying pole up the back, and a cross-piece from which the Banner itself will be suspended.  In order to do this, it needs loops or sleeves of some sort to hang from.  It's these I'm making next.

I'm using six of these tabs, as I'm going to call them (apologies if there's a correct term I'm not using!), three on each side of the carrying pole, leaving enough room for the pole fittings.  So, I needed six pieces of linen-lined velvet, cut to size and edged as usual:


Machine stitched, the seams herringbone-stitched for neatness, and turned right side out:


Using tailor's chalk, I marked on the back of the panel where they should go (the markings made sense to me, at least!):


The tabs were folded over to form a loop and tacked in place:


Then, using upholstery thread, they were back-stitched in place, plus for extra security, I stitched the sides down too, plus the usual herringbone stitching along the top:


This is not the neatest bit of stitching I've ever done, but going through so many thick pieces of fabric was not easy!  Oh well, it won't be seen.  Here they all are, stitched down:


I ladder-stitched the fronts of the tabs to the front edge of the panel, giving the finished view of the back:


Even thought the colours never come out very well in the photos, the eagle-eyed may notice that the tabs look slightly darker than the rest of the red.  This is because the pile of the velvet is going in the opposite direction.  I considered making the tabs from two pieces of velvet, so that the pile could go in the correct direction both front and back, but that would mean the weight of the Banner, which will be considerable, would be on a seam, and I really don't think that would be strong enough.  So, I decided it would have to be one piece, with the pile going the right way on the front.  The back, I'm afraid, will just have to be slightly wrong, and I'll have to hope no-one else notices!

Monday 19 December 2011

Interlining

Although the velvet is already lined, I'm going to use an interlining - an additional piece of fabric between the two sides of the Banner - to help support it.  The velvet is quite thick and heavy, so having additional support will help spread the weight evenly and give it extra body.

As it is quite thick and heavy already, I need some quite substantial fabric for this, and have used 12oz cotton canvas.  A pre-shrunk piece of the canvas (and it shrank a lot, should you ever want to use it yourself), was cut to size and edged, ready for use:


This was lined up over the back panel of the Banner, and then stitched into place.  To support it properly, it needs more than just stitching round the edges, so using a strong thread and some pretty big stitches, I sewed the canvas to the seams around the central cross and between the border panels:


It's not at all easy to see in the photo, but the stiches are there, honest!


With the interlining well anchored, I folded the edges of the Banner panel over it, mitred the corners, and sewed them down with herringbone stitch all the way round:


So here's the back of the Banner, interlined and finished:


There are a few bits and pieces to do before the front can go on, but I have some time off work, so you should see quite rapid progress from here to the finish.  Not long now!

Friday 16 December 2011

The front of the Banner - finishing

I still needed to do the same finishing to the front panel as I did to the back, so as before, I herringbone stitched the seams flat on the back to neaten things up:


And this time, I added a signature, stitching one of my woven labels onto the seam below the cross:


You never know, maybe a textile conservator of the future will find it one day!

The corner seams cut across the goldwork stems a little, so to make it all more integrated, I added a small amount of extra stitching over the seams:


So, here it is with what really was the last of the embroidery done:


All that was left to do was to add the braid around the central panel:


And it’s done!

Next – the interlining.

Monday 12 December 2011

The front of the Banner

Well, it's done - the front of the Banner has been successfully completed.  What a relief!

Ably assisted by my mum again, I did pretty much the same as before, though this time I had to take care to centre the border panels as well as the central cross.

I had a tracing paper outline with centre lines marked on, and used this to line it up, making sure the cowslips were in the middle:


Once the four pieces forming the border were cut out and edged (and I forgot to take a photo of that bit - sorry), I marked the centre points of each one and the cross panel with pins:


so I could match them up to sew:


Everything was machine stitched exactly as before, so without further ado, here it is:


If I say so myself, it looks pretty spectacular!

Wednesday 7 December 2011

The back of the Banner - finishing

I'd got the back of the Banner put together, but that wasn't it finished - there was still quite a bit of work to do.  Firstly, and the single biggest job remaining, I needed to sort out the back.

Even though it won't be seen, the back needs to be neat to make sure the Banner lies as flat as possible.  As the fabrics it's made from are quite thick, this wouldn't be possible without doing something to neaten up the seams.

Here's the back as it was immediately after finishing putting the pieces together:


Not too pretty, is it!  To tidy things up, I first pinned the seams flat:


Then used herringbone stitch to stitch them to the linen lining fabric, using a matching thread:


I was very careful to make sure that none of the stitches came through to the velvet, so this is completely invisible from the front.

With all the seams stitched down, the back looks much better:


It also helps support the piece, making it a little firmer; this wasn't intentional, but it's useful none the less.

So here's the front of the back, if you see what I mean, with the seams nice and flat and the corners trimmed:


It's still not finished though - I need to add braid around the central panel.  I used a curved needle, and used ladder stitch to stitch it in place:


It really lifts it, doesn't it:


The braid has been specially woven to match the red and yellow colours in the Banner, and its chequerboard design also echoes the flag of Northumbria.

I'm still not quite finished, though.  The Banner will be carried using a vertical pole with a crosspiece along the top (and more on that later). I don't want the Banner flapping around or swinging forwards, which would make it very difficult to carry, so I've added loops on the back for the pole to fit through.

These are in the same velvet with linen lining as the rest of the Banner, carefully marked so that the grain of the velvet is going in the same direction as that of the Banner itself:


These pieces were edged, stitched, had their seams stitched down, and turned right side out:


Then stitched to the panel, using ladder stitch again.  The pole will be 35mm in diameter; I found a tube that was 39mm, so a little wider, but I thought that if it could pass through, the pole itself should be fine:


So here's the Banner back finally finished:


Now for the front...

Saturday 3 December 2011

The back of the Banner - making it up

The time has come to start putting all the pieces together and make the Banner up.  I'm doing the back first; it's important to get it right, of course, but I feel I have a bit more leeway than with the front, so I can get a bit of practice in.

As a reminder, the design calls for a central cross (front and back), with a wide red border.  Here's the cross that'll form part of the Banner back:


I made a paper pattern the actual size of the central section, without any seam allowance.  I marked it into quarters, to show the centre and mid points of each edge, so I could line it up correctly, with the cross centred and the edges square on the grain of the fabric:


Using tailor's chalk, I marked around the edge, where the seams will go, and the centre of each side:


You can't tell from the photo - in fact, it was pretty hard to tell in real life! - but I tacked over the markings both to hold the shape in place and to transfer the marked out edges onto the back, too.

I then cut this out with a seam allowance, and edged it with the overlocker:


I did the same with the four red velvet panels that will form the border.  As the panels are plain I didn't have to centre anything, though I did take care that the top and bottom edges were straight:


It's a bit easier to see the tacking stitches this time!

Here it is cut out and edged:


I then tacked the first panel to the central cross:


If you look closely, you can see arrows marked on the linen lining.  Velvet needs to keep the grain all going in the same direction or each piece will look an entirely different colour, and I don't want it appearing to be in a variety of reds.  The arrows show which way up each panel needs to go, to keep everything going in the same direction.

So, machine stitched in place:


And the two sections joined together:


I did the same with the other three side panels, joining them to the central cross:


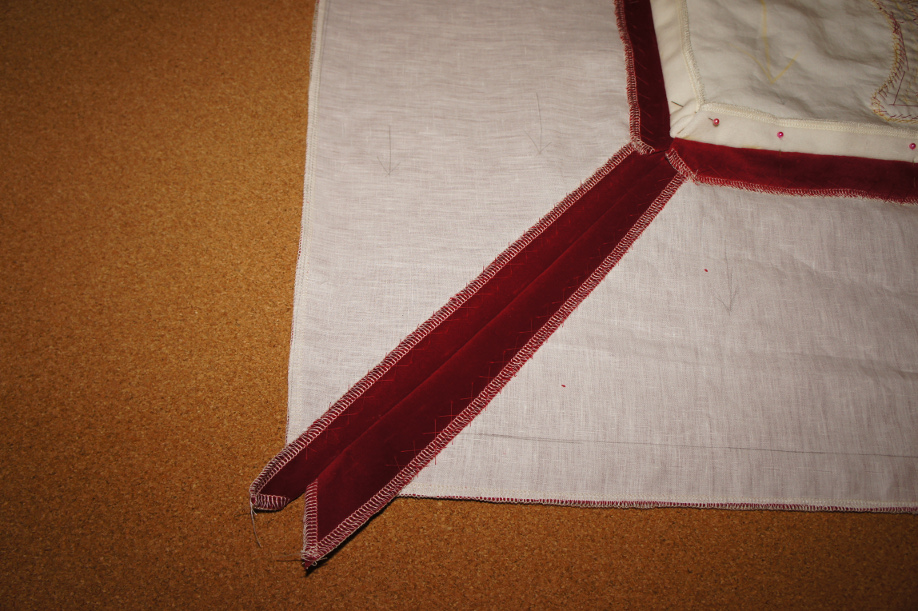
Now the really tricky bit: the mitred corners joining the side panels to each other.  I pinned them carefully:


Tacked them (though that's very hard to tell here, I'm afriad), and marked a nice clear line in red pencil to machine along:


I couldn't get the foot of the sewing machine right to the top, so I'll need to put the last (or first) few stitches next to the central panel in by hand later.

So, I machine stitched that and the other three corners, and...

Success!


It's such a relief that it all worked ok, especially with the front of the Banner still to do.  I can be quite confident now that it'll all turn out as it ought, though, which is a load off my mind!

There's still quite a bit of finishing work to do on the back first, though, and I'll tell you how that goes next time.

(Also, a big thanks to my mum, partially seen above holding it up, who came round and helped with moral support and cups of tea on what was rather a nerve-wracking day.  Thanks mam!)