Thursday 30 December 2010

...and to the left

Same again, but to the left of the cowslips this time.  A few stems added:


A few more flowers linked up:


Leaves and ferns joined together:


All done:


That's the lot for the bottom panel.  Hooray!  Here's the full panel, completed:


This still has the layout grid on, of course, but with that removed, all that's left are the flowers, as they'll appear on the the finished Banner:


You can't tell in the photo, but the tacking stitches for the grid have left slight impressions in the velvet.  I think this should largely solve itself and the pile of the fabric bounce back, so I'll leave it alone for a while and see how it gets on, but I may have to intervene.  I've got ideas on what to do if need be, but does anyone have any tips?

I must admit that I'm pleased with how it's turned out - it's as close to a pretty tricky design as I could get, and I think it works well. It's quite a relief!

Back to the beginning now, though, and the start of the second panel...

Monday 27 December 2010

To the right of the cowslip...

I hope you all had a happy and peaceful holiday; I had a lovely day with family, followed by a complete day off, doing nothing whatsoever. Bliss!

Back to work now, though.  I've got a few days off the day job, so I want to get as much done as I can before I go back in the New Year.  Things are coming along nicely, though, with all the flowers to the right of the cowslip edged (and yes I know I said I was going to start in the middle and work out, but it somehow didn't happen like that!)

Here are a few more flowers done, with stems linking the wood avens flowers and leaves together:


Then another fern and a pearlwort:


And the two larger wood avens:


And then some twiddly bits linking things up:


And finally, all of the right side, completed:

Thursday 23 December 2010

Curved stems

Other than the cowslips, all the stems on the panel are wavy or curved.  I applied all the flowers more or less by eye, aided a lot by the grid, and that's what I'm doing for the stems too.  Well it's worked so far!  All the same, I'm not a make-a-start-and-see-where-it-leads-you sort of person, and I like to have a pretty good idea of where things are to go.

For this stem, I started with a couple of couching stitches at the top of the thread, next to the flower:


Using Fiona's design as a guide, I laid the thread on the fabric, and moved it about until I was happy with the line it took. Unfortunately, it wasn't just going to sit there and wait for me to stitch it down - it needed to be held in place.  So, I added a handful of stitches all the way down the thread:


Here it is with half a dozen or so stitches down the length of the thread:


This was enough to hold the shape of the line as I went back up the thread, couching it down with stitches spaced about a millimetre apart:


And with a couple more stems added:


For the first time, I actually quite like the fern!

Wednesday 22 December 2010

Cowslip stems

The flower stems are quite flowing (well, most of them), so I've decided to start from the centre again and work out, to get the flow right.  This means beginning with the cowslips, which are actually the only flowers with straight stems.

To work the stems, I'm couching two strands of the same imitation Japanese gold thread that I used singly for the edging.  I want the colours to remain consistent, so the couching thread is the same green as whatever I used for the leaves or flower sepals.  As ever, though, the cowslips manage to make this more complicated than the other flowers.  The cups at the bases of the flowers are the palest shade of green I've used, Madeira 1409, while the leaves are a shade darker, 1410.  As the stems run from the flowers to the leaves, which one do I use?

Both!

Starting at the flower end, I couched the gold thread down with stitches quite close together, using the pale green thread:


I want to shade into the darker green as I go down, so I added a few stitches further and further apart, to about a third of the way down:


I then filled in the gaps and finished couching the gold thread with the darker of the two greens, so that they shade into each other:


The other two stems are very short, so I just used the one colour, 1410, for them.

So here's the cowslip, with it's stems added:


The rest of the stems on the design are curvy, wavy lines - I'll start them next.

Monday 20 December 2010

Edging the rest of the flowers

I've been stitching for hours, trying to get caught up on the bottom panel of the Banner.  My (self-imposed) deadline for completion was Saturday, so I'm afraid I've missed it already. Still, I'm doing the best I can, and I hope to get at least partially back on track over the next couple of weeks.

As part of that, I've got all of the rest of the flowers on the panel edged.  Here are a few done to the left of the cowslip:


And a few more:


And then the wood avens flowers and leaves:


And then the very last fern:


So here's the full panel, completely edged:


That's a big step forwards, but it's not finished - there are all the stems still to add...

Saturday 18 December 2010

Edging the cowslips

The cowslips are easily the fiddliest of all the flowers.  They're pretty, but fiddly.  You may remember that I gave up all hope of cutting out all of the gaps between the individual flowers on the flower heads, and filled in the smaller ones with stitching in a red thread to match the velvet background.  Now I've come to edge them, not only to I need to couch the gold thread around the real edge, but also the pretend one, around the stitched red infill. Fiddly!

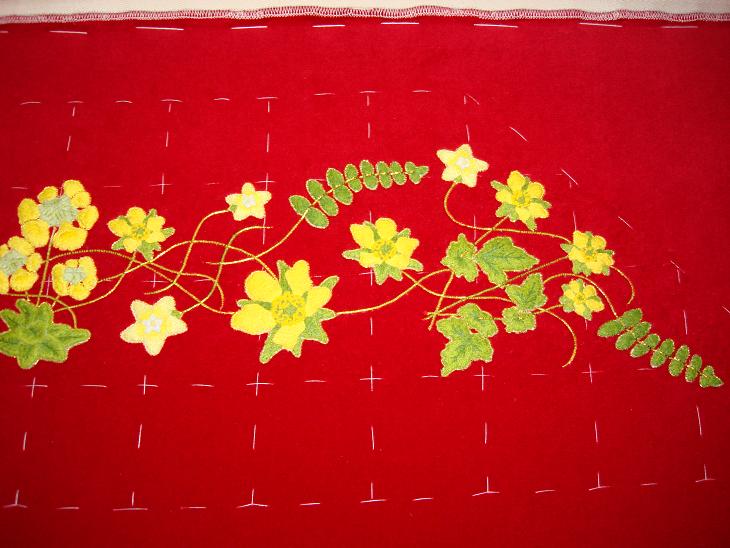
I've already edged the leaves, as they're straightforward, so here are the cowslip flowers, ready to start:


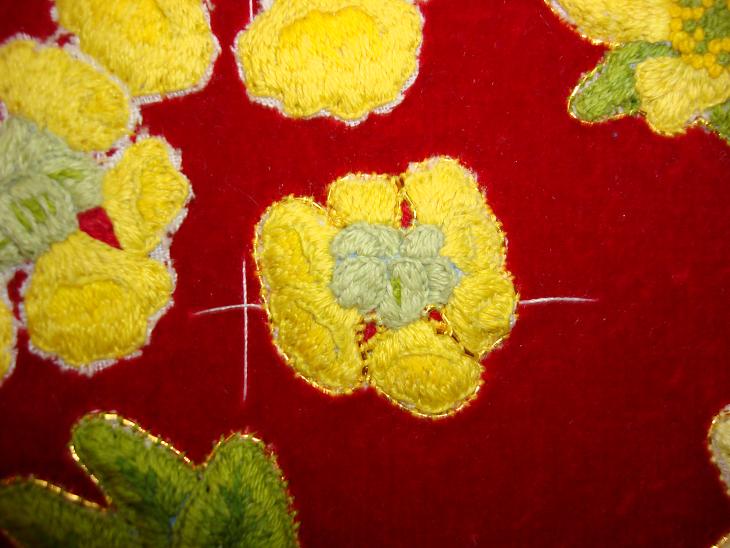
Starting with the smallest of the flowers, I couched the gold around the outside of one of the stitched infill areas, even though it's not on a cut edge.  As some of the flower heads overlap others, this dictated which way round I needed to go:


Once I'd gone around this area, I reached the genuine edge, and could start couching round that:


It's quite a complicated shape, with a few ins and outs, though the size of this flower (about 1" or 2.5cm in diameter) means that there's not room to do anything too fancy.

I followed the edge of the flowers, rather than the cut edge, all the way round.  The final flower head is behind the ones next to it, so that needed to be done with a separate piece of gold thread. Here's the final flower, finished and neatened:


The other flower heads are the same, though as they're larger, it's a bit easier to see what's going on.  Here's the second flower, partially worked:


And finished off:


The third and largest of the flower heads is behind the second one, so the edging had to reflect that, starting and finishing on either side of it:


And again, here it is finished off:


And finally, the completed cowslip:


Now that all the edges are neatened, I bet you can't tell which red bits are stitched and which are velvet!

Tuesday 14 December 2010

Gold edging (continued)

I'm running a bit behind schedule at the moment - there's too much else to do at this time of year! - but I have done more of the gold edging round the flowers.  Here are a few more done:


And a  close-up of the completed wood avens, for no reason other than I’m quite pleased with how they’ve turned out:


I'm almost half way through them, which is quite encouraging.  It's the cowslips next, which are going to be a bit on the fiddly side, though.

Wednesday 8 December 2010

Gold edging

With all the flowers in place on the background fabric, it's time to start the edging.

This serves two purposes: the practical one of neatening the edges and covering the remaining cut linen, and a more decorative one of adding a bit of sparkle.

I'm using imitation Japanese gold passing thread no. 8, the same as for the goldwork on the central crosses, but in this case just singly.  To couch it down, I'm using a single strand of whichever stranded cotton I used for the edge of the flower; the idea is to harmonise with the flower itself, but still have the gold showing through to lift the design.


For the pearlwort flowers, this is Madeira 0103.  I'm placing the couching stitches quite close together, just a millimetre or so, partly because that just works better for a small curved shape such as this, but also because it then gives more of a feel of the colour, which is the effect I'm after:


Not all of the outline of the flower is in the yellow, however, so for the green area, I've switched to a single strand of the green I used for it, Madeira 1410, to couch the gold:


I then pulled the ends of the gold thread through to the back of the fabric and finished them off neatly.

The gold thread has covered most of the linen edging, but there are a few stray fibres sticking out. It's too much of a risk to try and cut them and I don't want to try and pull them out, so I used the eye end of my needle to tuck them back under the flower, out of sight:


Here's the finished flower:


And here's as far as I've got so far:


There are a lot more to go!  You can see the difference between the edged flowers and the ones still to do quite clearly - it's a big improvement.

This is a bit more time-consuming a process than applying them to the fabric in the first place, so there's quite a bit of work still to do.

Sunday 5 December 2010

All the flowers added

I was wrong when I said I only had a few flowers on the right still to add - when I checked the design, it turned out there was still a fern to go on the left, too.  And here it is:


After that, there really was just a few flowers (and another fern) to go on the right, and here they all are:


So, that's all the flowers cut out and attached, but not the panel finished.  Next, I'm going to edge all the individual pieces in gold.

I think I should point out, that while the panel clearly isn't symmetrical, it isn't meant to be - fortunately, as that makes life rather easier!  Either side of the cowslip is similar to each other, but the Fiona's design is subtly different on each side.  I like this - I think it adds life and interest.  Happily for me, it also means that if a piece isn't quite aligned with the matching piece on the opposite side, it doesn't really matter.  I can just tell everyone it's meant to be like that!

Friday 3 December 2010

More flowers

It's a beautiful sunny day today, though at -8 degrees Celsius I'm not expecting the snow to thaw any time soon. Never mind, it's nice and cosy indoors, and I've got plenty to do.

Including adding more flowers to the bottom panel of the Banner, which is coming along nicely.  Here it is with a few more added:


And in close up:


And with a few more after that:


Just a few more to add on the right, then they're all in place.