Tuesday 29 March 2011

Goldwork edging: cowslip and ferns

I'm making good progress with the goldwork edging, with quite a bit to show you today.  First, the cowslip in the centre of the panel.  Here are the leaves, with the gold thread couched with Madeira stranded cotton 1410:


The smallest of the three flowers, using Madeira 0105 for the couching stitches:


And the medium-sized one:


As the flowers are quite a complex shape, I can't just go all the way round with one length of thread, I need to stop and start.  So, here's the largest flower before I finished off the ends, to show how many small lengths were needed:


The ends were all pulled through to the back of the fabric and finished off neatly:


So here's the cowslip, nicely edged with gold:


This central section also has three more ferns, and I did them next.  The one above the cowslip:


Below and to the right:


And to the left:


Here's the central section with the finished cowslip and ferns, and a couple of little flowers creeping into shot:


And all the goldwork edging done so far:


I'm over half way!  There's still quite a bit of edging to do, but at least I feel I'm on the last lap.  Of this phase, anyway...

Sunday 27 March 2011

Lots of little flowers

Some light at the end of the photography tunnel, or so I hope: I've bought a new camera!  It's a bit complicated, though, with lots of settings I don't understand, so it's likely to take me a while to get to grips with it.  From this you can probably gather that the standard of photography isn't about to improve any time soon, but let's all hope that once I've worked out what I'm supposed to be doing that the pictures pick up.

Anyway, more flowers edged with goldwork.  A wood aven:


And a pearlwort:


The wood aven and the pearlwort with the ferns and foxglove:


The biggest wood aven, next to the central cowslip:


And all the little flowers together:


Heading up to half way, all the edging done so far:


I think I need to find out how to use the flash!

Thursday 24 March 2011

Edging the foxglove in gold

First, a quick note on photographs.  I won't bore you with the reasons but some of the photos here are taken with a proper camera, and some, the ones further down, with my phone.  This has not helped with their quality, so sorry about that, but hopefully you should still be able to see what I'm talking about.

Back to the sewing: the next flowers to get their goldwork edging are the foxgloves.  I started with the biggest flowers and worked my way along, so here are the two largest ones done:


I know I mentioned it before, but it still amazes me how much of a difference this makes; the edged flowers look nice and neat, while the unedged ones look ragged and messy.  It really demonstrates how well worth doing this stage is!

I'm couching the gold thread with the embroidery cotton of the same colour as the edge of the flower itself.  So far, with the fern and the foxgloves, that's just been the one colour (Madeira stranded cotton 0101 for the foxglove), but the flowers, or rather the buds, towards the top have an edge in two colours, 0101 and 1409 (pale green).  This means couching part of the gold outline in one thread, then switching to the other to complete it:


Here are all the small flowers and buds, showing the two colour couching stitches:


And the completed foxglove in its entirety:


Finally, an extremely bad picture of all the goldwork edging done so far:

Saturday 19 March 2011

Goldwork edging

Now all the appliqué’s done, it's time to start edging all the embroidered pieces with gold thread.  I like this stage - it makes a huge difference to the look of it.

As I was already at the right-hand end of the panel, it seemed reasonable to start the edging there, and work my way back along, which more or less means doing the flowers in reverse order to how I stitched them on.

To do the edging, I'm couching a single no. 8 imitation Japanese gold thread around the edge, using one strand of the same stranded embroidery cotton that I used for the buttonhole stitch around the edge of each piece as the couching thread.  The stitches are quite closely spaced, about a millimetre or so apart, which gives an effect which tones with the colour of the applied item but still allows the gold to sparkle through.

So, starting with the last three ferns to be applied, here's one of them edged, using Madeira stranded cotton 1411 as the couching thread:


And another one:


Just as a comparison, here they both are with an unedged flower in between:


It makes quite a difference, doesn't it!  The only thing I've done is couch the gold thread around the edge - I haven't trimmed the linen margin at all, for instance, though I admit that any odd linen fibres that were still visible after I’d finished the goldwork I poked under it with the eye end of a needle, to make sure everything was as neat as possible.

Adding the edging really does transform the appliqué, and really is worth doing - I always edge appliqué, whether with a couched thread or cord as here, or with a row of stitches (usually chain stitch) around the outside in a matching or toning thread.  The way it neatens things up is amazing.

So, here are all three ferns, neatly edged, and making the rest of the flowers look rather messy:


Never mind, they'll all get their turn!

Wednesday 16 March 2011

Foxgloves and ferns

A double helping today, with the second foxglove and three more ferns all added to the panel.

As with the first one, I added the stem of the foxglove first, by couching gold thread:


Then added the top and bottom flowers, to help with the spacing:


And then added the rest of the flowers in between:


Here's the full panel, with all the flowers added so far:


Not far to go now, just the third-last fern:


The second-last:


And the very last one (well, for this panel, anyway):


That was the last bit of appliqué to do, so now all the flowers are on, and ready to edge:


Shortly after taking these photos, my old camera finally died.  I've borrowed my dad's for now (thanks Dad!), but I as I need to get a new camera anyway, I'm going to upgrade and get something a bit better than the little point-and-click compact cameras I've had up to now.  I live in hope that this might improve the standard of the photography here and on my website, but as this is likely to take a bit of practice, don’t get your hopes up too far just yet!

Saturday 12 March 2011

Maker Faire UK 2011

I took a day out from sewing today and went to the UK Maker Faire in Newcastle upon Tyne, and I was very glad I did - it was fantastic!

Held simultaneously at two venues, I started at the Centre for Life.  It was busier than I expected and I had to queue for a while for a ticket, but it was worth the wait.  As you might expect, there were a lot of people making things, mostly though not all electronic:


There were also a lot of stands with individuals and groups of makers, who were all very happy to talk, even though my first question was usually, 'What's that?'

Amongst a great deal of other stuff, there was a geodesic dome made out of estate agents' signs:


The Thing-O-Matic 3D printer, here printing out a key fob:


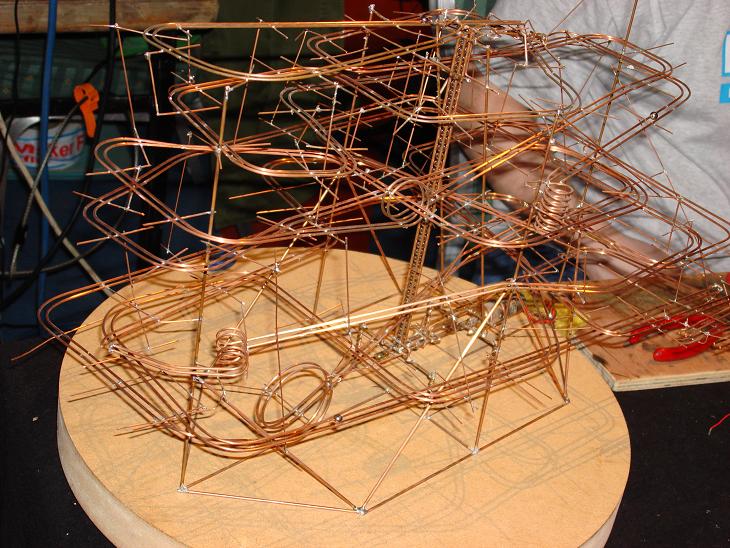
An intricate copper wire and ball bearing thingummy:


And a reel-to-reel-to-reel old fashioned tape setup, recording, overlaying and looping sounds, like an improv Radiophonic Workshop:


There was rather less steampunk than I'd expected, but a couple of heroic representatives:


And, I was very excited to see, Tesla coils!


I've never seen these for real before, so somehow it came as a surprise that the arcs are three-dimensional - they clearly occupy a volume, rather than being in a flat plane.  I don't know why I didn't expect that, but I didn't.

Outside, there was a marvellous scrap metal dragon:


He moved his head and neck, tail and wings (which don't show up at all here, sadly), and, thanks to the propane tanks in his chest, breathed fire:


He was impressive enough for a couple of Daleks to come along for a look!


Some token textiles - someone was yarn-bombing the area, with random knitting attached to trees, lamp-posts and street signs:


That was on the way to the second venue, the Discovery Museum.  It was absolute pandemonium - the numbers of people attending by this stage was huge - not helped by Titan the Robot doing a turn and completely blocking the entrance:


This is a terrific museum, with an emphasis on science and engineering, but which somehow has a good textile collection too.  This was not the ideal day for a proper look round, however, so I'll just settle for a peek at the Turbinia, the first vessel to be powered by a steam turbine:


And finally, the highlight of the day: Arc Attack.  Sadly, none of my photos turned out at all well, so this really doesn't do them justice, but what we have here is a man in a chainmail suit (a wearable Faraday cage), playing the Doctor Who theme tune with a million volts of electricity:


It might be hundred-year-old technology, but it was still one of the most amazing things I've ever seen.

The Maker Faire is on tomorrow too, so if you're in the Newcastle area, go and have a look.

Friday 11 March 2011

A constellation of flowers

I'm a little over half way through applying the embroidered flowers to the background fabric of this panel; as there's just the one cowslip in the middle, and that's already on, adding the flowers to the right end should take less time than adding them to the left.

Starting with the little flowers, we have the biggest pearlwort, near the centre:

Ruth O'Leary Textile Art - big embroidered pearlwort

Three little pearlworts, grouped together:

Ruth O'Leary Textile Art - three little embroidered pearlworts

And one final pearlwort, on its own:

Ruth O'Leary Textile Art - isolated embroidered pearlwort

All the pearlworts:

Ruth O'Leary Textile Art - all the embroidered pearlworts

Next, there's the big wood aven, also near the centre:

Ruth O'Leary Textile Art - big embroidered wood aven

And a couple of smaller ones, quite widely spaced apart:

Ruth O'Leary Textile Art - widely spaced embroidered wood avens

All together, they form a constellation of embroidered flowers:

Ruth O'Leary Textile Art - a constellation of embroidered flowers

Here's work so far on the panel; not far to go now!

Ruth O'Leary Textile Art - work so far on St Cuthbert's Banner panel

By the way, have any other Blogger bloggers out there noticed a drop in quality on their photographs?  The ones I uploaded may not be the best, but they're a lot better than they look here.  The originals are bigger than this, and are being resized downwards automatically to fit on the page; the murk on the picture looks to me like an artifact of the compression process.  Does anyone have any ideas on this?