Tuesday 23 December 2014

White snowdrop sample - cutting out and making up

Happy holidays everyone!

I'd wanted to get this finished before the festivities and have just made it, so here we go.

You know the drill by now: I painted the back of the stitches with diluted PVA glue, and after leaving it to dry overnight, could start to cut it out:


And fully cut out, including the fiddly bits in the middle:


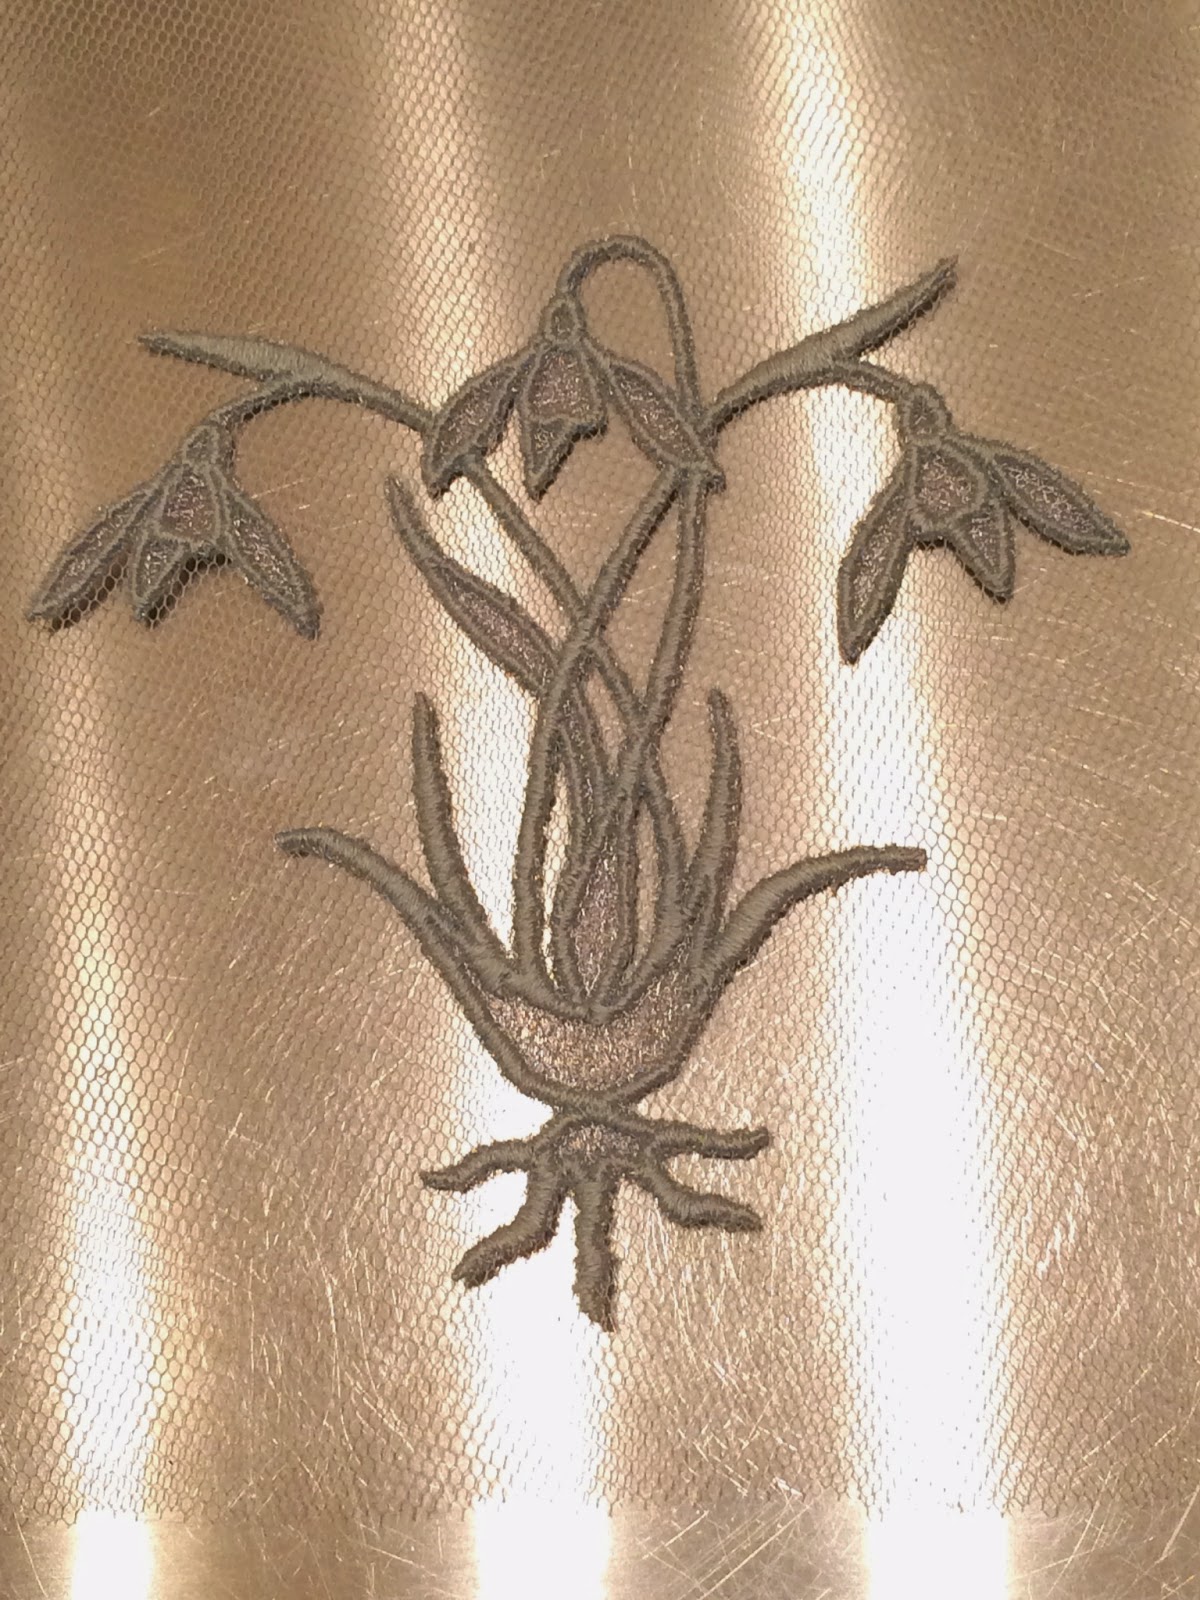
I think it looks pretty good against the black background, but the idea here was white-on-white, so I stitched it to a piece of white silk satin.  Pinned into position:


And stitched:


I backed this with some dove grey satin, just to neaten it up.  The finished piece:


I'm not 100% happy with how this has turned out.  The stitching gives a textured appearance which usually I like, but I think something smoother would have worked better in this case: if I was doing it again I would use satin stitch instead.  Still, that's the whole point of doing these sample pieces, to experiment and find out what works and what doesn't, so that next time I can do it better.

Maybe I should make 'try and do it better' into my resolution for 2015.  See you in the New Year!

Friday 19 December 2014

White snowdrop sample - filling in

Quite a lot of stitching but none of it very interesting, so I'll cover it all in the one post.  Still using the same colour, I've filled in the entire design in what's supposed to be long and short stitch but I suspect has really turned into split stitch.  No shading, just white.

Here's some of it:


A bit more:


And a flower:


And the other flowers:


Done!

Cutting out and making up next.

Sunday 14 December 2014

White snowdrop sample - outline

For this I'm only using one colour: white:


That's Madeira stranded cotton no. 2401.

Part of the outline in split stitch (against a black background so you can see it):


And the rest:


I'll start to fill it in next.

Thursday 11 December 2014

White snowdrop sample

Same design, slightly different approach.  This time, I want to see how it works in white-on-white.  I'll be using the same cut-out-and-apply technique so it's not proper whitework, of course, but I'm interested to see how convincing - or otherwise! - it is.

So starting out the same as before, tracing the design onto silver organza with a light blue ultra-fine Sharpie pen:


The traced design taken off the drawn image that was beneath it in the first photo:


Painted white, and still on the paper:


Off the paper, onto a frame and ready to stitch:


It's a bit faint, but it's still easy enough to see, so I shouldn't struggle to stitch over the lines.

Saturday 6 December 2014

Silver snowdrop sample - completed

With the snowdrop cut out, I needed to stitch it to a background fabric, but as this is an experiment, I decided to try a completely different fabric to usual: net.

Pinned to a square of white net:


The pins all go over the stitching, not into it, and are enough to hold it in place.

I stitched it down with the same stranded cotton used for the satin stitch, with the stitches going right over the stitched parts (outlines and leaves) rather than into the stitching, in the hope that it wouldn't be visible when I was finished:


I think that works well, I'm pleased, though to make it stand out a bit better and feel a bit more robust, I stitched the net to a square of white silk satin:


They're just held together with a line of zig-zag machine stitching along the top - the snowdrop isn't stitched to the satin background at all.

All in all, I'm pleased with how this has turned out.  I think perhaps this technique would work better with a design with larger areas for the Italian tubular mesh wire ribbon to show through, but as a proof of concept it's turned out well.

And I do like that snowdrop...

Tuesday 2 December 2014

Silver snowdrop sample - cutting out

And now the bit I've really not been looking forward to: cutting it out.  It's quite a fiddly design with quite a few skinny bits, so the potential for disaster is quite high.

No photo of this bit, but as is now becoming routine, I painted over the back of the stitching with watered-down PVA glue.  I only painted over the stitching, not the unstitched areas of the mesh in the centre of the larger parts of the design, as I didn't want anything coming through the the front where it might be visible.

Once that had dried properly (I always leave it overnight, to make sure), I started cutting it out - first around the edge:


I didn't notice that the snowdrop on the left had got tucked under the central one until it was far too late to retake the photo, but never mind.  You might also be able to see what looks like fluff on the paper it's resting on - this is actually little bits of wire from the mesh, which frayed everywhere from the offcuts, but - thankfully - not the side that had been overstitched.  I'd been a bit worried that it might all just unravel, but happily it didn't.

The unwanted areas in the middle cut away - the really scary bit!


Success!  That's a relief.  Stitching it to a background fabric should be plain sailing.

Sunday 30 November 2014

Silver snowdrop sample - the snowdrops

Another ghastly photo, but hopefully you can more or less tell that I've finished the satin stitch for the upper leaves and  around the edge of the snowdrops:


That's all the embroidery done - now to cut it out...

Thursday 27 November 2014

Silver snowdrop sample - satin stitch

To hold the silver mesh in place, I'm stitching over it in sating stitch around the edge; the double row of split stitch forms the extent of the satin stitch, leaving as much of the mesh exposed as possible.

The roots first:


Stems and most of the leaves:


The large single leaf:


My stitching looks terrible in the photo - the light seem to catch everything and makes it look much worse than it does in reality.  Or I think so, anyway - you'll just have to believe me!

I'll do the snowdrops themselves next.

Sunday 23 November 2014

Silver snowdrop sample - outline

A short post for a fair amount of sewing: using split stitch, I've worked a double row of stitches around the outline of the design, and just inside it:


I want the silver mesh to form the design and so be as visible as possible, but it also needs to be held firmly in place so stitching is needed, so a compromise is needed.  Now the outline is done, I can do the proper stitching next.

Wednesday 19 November 2014

Silver snowdrop sample - Italian tubular mesh wire ribbon

As I mentioned before, the point of this sample is to try something using the Italian tubular mesh wire ribbon (henceforth referred to as 'mesh' as it's a lot easier).

Here's the design on the fabric, stretched on a frame:


The design is clearly far too fiddly to try and apply the mesh to it, so I'm going to try the opposite: use the mesh as a background and stitch over it.

Here's the mesh itself in silver, and the thread I'll be using:


Just the one colour, Madeira stranded cotton no. 1708, a silver-blue.

I cut a length of the mesh, slit it down one side to make double the width of the ribbon, and stretched it out as far as it could reasonably go.  And then did it again as just the one thickness looked a bit thin.  I then placed both of these one on top of the other over the painted design, and pinned it in place:


Next time, I'll start stitching over it.

Monday 17 November 2014

Silver snowdrop sample

Another sample piece.  You may remember that earlier this year when working on the Apple Tree fire screen I had a go at using Italian tubular mesh wire ribbon but it didn't work at all and I took it off.

This was the right thing to do for that particular project, but it's been at the back of my mind since that there must be something else I could do with it.  This sample piece is an attempt to do just that, so we'll see how it works this time!

The design first.  I'm using a slightly adapted version of a Victorian snowdrop motif I found on the British Library's Flickr site, which is well worth a browse if you have a few days to spare - it's a terrific time sink!  It's also a marvellous resource for out-of-copyright images, so well worth checking out.

Anyway, the snowdrop:


I traced this onto some silver organza:


I've been experimenting with pens, and have opted for ultra-fine Sharpies: they have a very fine nib, they come in lots of colours, and - very importantly for this - they're colour fast and so won't run when I paint over them.  As you can see, I've used a mid-blue for this.

The traced outline:


And painted over with acrylic paint thinned down with water:


It looks grey in the photo, but is silver in real life. It's still stuck to the paper the fabric is pinned to there; it'll be a lot paler once it's removed.

Ready to start sewing!

Sunday 16 November 2014

Hello to new readers!

If you're new to this blog and have followed a link here from Mary Corbet's site, then a big hello, and I hope you'll keep on reading.

If you did come here from Needle 'n Thread then you've probably already seen the Apple Tree fire screen:


but you might also be interested in some of my other work.

The highest-profile commission I've had was for a processional banner for Durham Cathedral, in England, St Cuthbert's Banner:


There's a BBC News video about that, too!

I've done quite a lot of goldwork over the years, including in 3D, such as the Dragon:


And colour shading, such as the little landscape on this book slipcase:


Or another landscape, of Gibside Chapel, here:


I'm also very interested in Celtic designs, such as this fire screen:


My current work is more with shading, such as the Apple Tree we started this post with, but one of the many wonderful things about embroidery is that there's always something new to try, so who knows what I'll end up doing!

It's always great to hear from readers, and I do work to sell and to commission, so if there's something you're interested in, please get in touch.


Thursday 13 November 2014

Acanthus leaf sample - completed

As this is just a sample piece I'm not making it up into anything, but I still want to finish it off nicely and put it on a background.  The first step towards that is to paint diluted PVA glue on the back:


It's still damp there so the colours look a little darker.

Once that had dried properly I then cut it out, which was a bit fiddly but OK:


I should say that the glue on the back is strong enough to hold the stitching together, but thin enough for the the embroidery to still be flexible; it's not at all stiff.

I then applied this to a cream silk satin background, then added a plain backing, just to cover the stitches and make it look neat:


Finished!

I like it - I'm pleased with how it's turned out.

Sunday 9 November 2014

Acanthus leaf sample - embroidery finished

All the filling in done!

Half the second half:


And the remainder:


That's all the embroidery, so next it needs to be cut out and applied to a background.

Wednesday 5 November 2014

Acanthus leaf sample - more filling in

Still filling in!

All the left-hand half done:


That's half of it done, and I think it's working quite nicely.

Sunday 2 November 2014

Acanthus leaf sample - starting to fill in

With the shading done, I can start to fill in the rest, using two strands of the palest shade, 1908.

Here's one leaf done (and photographed against a dark background, to make it stand out a bit better):


And the rest of that section:


There's still a way to go, but I'm happy with how it's looking.

Wednesday 29 October 2014

Acanthus leaf sample - a bit more shading

The shading is coming along.  A bit more added, to the left hand half:


This uses one strand of 1910, as before, but with one strand of 1908 (the same shade as used for the outline).

The second half too:


That's the shading done - time to start filling in the rest next.

Wednesday 22 October 2014

Acanthus leaf sample - a bit of shading

Dear me, it's been a long time since my last post - I've been rather busy with other, non-sewing, things, so sorry about that.  I'm getting back to my stitching now, though, so things should get back to normal soon.

I've made a start on adding some colour, starting with the darkest shade, Madeira 1912, at the edges of the leaves:


I then started the shading, adding some more stitching using one strand of 1912 and one of 1910:


More shading next.