I'm very happy to tell you that my new-look website with integrated blog is now live, at http://www.rutholearytextileart.co.uk.
If you want to go straight to the blog, or update any links to it you may have, then go to http://www.rutholearytextileart.co.uk/content/.
This version of the blog will remain live for a little while to give regular readers the chance to move over, but it will be shut down in due course, and it will not be updated - to see new posts, you'll need to read the new one.
I've been writing this blog since 2009 and it's been great fun to do, not least because of the kind, generous readers who say such nice things and are always unfailingly helpful and supportive. If you didn't read it, I wouldn't write it, so I have you to thank!
I do hope you'll join me on the new blog - see you there soon!
Friday, 10 April 2015
Wednesday, 8 April 2015
The blog is moving VERY SOON
Sorry for not posting anything for ages, but there are some major developments underway for the blog.
Very soon - in the next day or two, all being well - it'll have a new home. I'll post the link once it's up and running.
Watch this space!
Very soon - in the next day or two, all being well - it'll have a new home. I'll post the link once it's up and running.
Watch this space!
Wednesday, 1 April 2015
Plantagenet Wreath - cutting out
With all the embroidery done, the next stage is to cut it out so that it can be applied to the background fabric. I have to admit I haven't been looking forward to this much as it's such a fiddly shape, but I relieved to be able to tell you that it's now done and with no disasters.
While it was still on the frame and so taut, I painted the back of the embroidery with diluted PVA glue, to prevent any fraying. Then, off the frame and with the fabric on the outside of the embroidery cut away:

Then the fabric in the centre:

And last and very definitely worst, the bits between the intertwined stems and the broom flowers:

After that, stitching it to the background should be the easy bit!
While it was still on the frame and so taut, I painted the back of the embroidery with diluted PVA glue, to prevent any fraying. Then, off the frame and with the fabric on the outside of the embroidery cut away:
Then the fabric in the centre:
And last and very definitely worst, the bits between the intertwined stems and the broom flowers:
After that, stitching it to the background should be the easy bit!
Sunday, 29 March 2015
Plantagenet Wreath - roses (part III)
The roses are finally finished! Sorry that they've taken so long, but I got there in the end.
Last time, I'd filled in half of the 20 roses; I've now done them all, and here they are:

They're not quite finished, though: the little green leaves (or whatever the correct name is - does anyone know?) still need to be completed.
And here they are!

That's all the embroidery - now I need to cut it out. Now that's going to be fiddly.
Last time, I'd filled in half of the 20 roses; I've now done them all, and here they are:
They're not quite finished, though: the little green leaves (or whatever the correct name is - does anyone know?) still need to be completed.
And here they are!
That's all the embroidery - now I need to cut it out. Now that's going to be fiddly.
Tuesday, 24 March 2015
Advance warning: the blog is moving!
Just a note for regular readers: this blog will be moving to a new address in the next few weeks.
For years now, my website and my blog have been at different locations. I'm currently getting the website redeveloped, and as part of that I'm bringing the blog into it. All past posts should still be present and correct (I hope - that's the plan, anyway) but will be at the new address, and after the changeover happens all new posts will be there too.
I don't have a date yet when this is going to happen - it's still early days for the development work - but it should be reasonably soon.
I'll let you have more details when I know them!
Thursday, 19 March 2015
Plantagenet Wreath - stitching the roses
Still slow progress on the roses, though I am getting there. In the mean time, here's a closer look at stitching one individual rose.
The shading is already done, of course, so here I'm just filling in the rest with the off-white.
This is one of the larger roses, so there's a bit more stitching involved to fill it all in but the principle is the same for both. Firstly, I did all the rose petal 'lips', the bits that fold over at the top:

Before starting on the rest of the petals, I make life a bit easier for myself by putting in stitches to show where each petal starts and finishes:

I then went right round the rose adding a layer of long and short stitches:

And then round a second time, filling in the rest:

One more rose finished! Still quite a few to go though...
The shading is already done, of course, so here I'm just filling in the rest with the off-white.
This is one of the larger roses, so there's a bit more stitching involved to fill it all in but the principle is the same for both. Firstly, I did all the rose petal 'lips', the bits that fold over at the top:
Before starting on the rest of the petals, I make life a bit easier for myself by putting in stitches to show where each petal starts and finishes:
I then went right round the rose adding a layer of long and short stitches:
And then round a second time, filling in the rest:
One more rose finished! Still quite a few to go though...
Thursday, 12 March 2015
Plantagenet Wreath - roses (part II)
Other things have got in the way a bit recently, so I haven't got as far as I'd hoped with the roses. Still, I have done half of them, which is something.
And here they are, filled in with Madeira stranded cotton no. 2402:

The full wreath:

I'm going to be busy for the next couple of weeks too, but I'll do what I can, and hopefully it won't be too long before I can show you them all finished!
And here they are, filled in with Madeira stranded cotton no. 2402:
The full wreath:
I'm going to be busy for the next couple of weeks too, but I'll do what I can, and hopefully it won't be too long before I can show you them all finished!
Thursday, 5 March 2015
Plantagenet Wreath - roses (part I)
Just the roses left to embroider.
You may remember that when we looked at the colours to be used for the roses, it included a shade of pink, Madeira stranded cotton no. 0303. Although the roses are going to be (mostly) white, I'm using a bit of pink too.
The stylised rose design has a feature that I've always taken to be the top of each petal turned over a little. I need to highlight this in some way, and so as the embroidery will be applied to a dark red velvet once it's completed, I'm picking it out in a complementary shade: the pink.
I've stitched over the lines of this detail in split stitch:

And a close-up:

If this is an overhang, then there should be a bit of shadow cast underneath it onto the petal below; I'm adding this using small stitches in one strand of the pink and one of the off-white used for the outlining, no. 2402:

and in close-up again:

Next time, I'll fill in the rest of the roses.
You may remember that when we looked at the colours to be used for the roses, it included a shade of pink, Madeira stranded cotton no. 0303. Although the roses are going to be (mostly) white, I'm using a bit of pink too.
The stylised rose design has a feature that I've always taken to be the top of each petal turned over a little. I need to highlight this in some way, and so as the embroidery will be applied to a dark red velvet once it's completed, I'm picking it out in a complementary shade: the pink.
I've stitched over the lines of this detail in split stitch:
And a close-up:
If this is an overhang, then there should be a bit of shadow cast underneath it onto the petal below; I'm adding this using small stitches in one strand of the pink and one of the off-white used for the outlining, no. 2402:
and in close-up again:
Next time, I'll fill in the rest of the roses.
Thursday, 26 February 2015
Plantagenet Wreath - broom flowers
The broom flower blossoms next. No shading, just yellow.
The first fifty:

And the second:

Although the layout is quite formal, all the flowers are slightly different - I didn't want the design to be rigid, and so while the positioning is uniform, I drew each flower freehand.
Here's a close-up of one set, to see them in more detail:

It's coming along - just the roses to embroider.
The first fifty:
And the second:
Although the layout is quite formal, all the flowers are slightly different - I didn't want the design to be rigid, and so while the positioning is uniform, I drew each flower freehand.
Here's a close-up of one set, to see them in more detail:
It's coming along - just the roses to embroider.
Sunday, 22 February 2015
Plantagenet Wreath - little green caps
The broom flowers are to be filled in next, all one hundred of them, and I'm starting with the little green caps at their bases (I'm sure these have a proper botanical name but I have no idea what it is!).
These are in the lightest shade of green, Madeira stranded cotton no. 1401. The first fifty worked in satin stitch:

and all hundred:

These are rather small and not that easy to see, so here's a close-up of a set of ten:

I'm really pleased with how it's coming along, and I'm looking forward to doing the flowers themselves next.
These are in the lightest shade of green, Madeira stranded cotton no. 1401. The first fifty worked in satin stitch:
and all hundred:
These are rather small and not that easy to see, so here's a close-up of a set of ten:
I'm really pleased with how it's coming along, and I'm looking forward to doing the flowers themselves next.
Tuesday, 17 February 2015
Plantagenet Wreath - stems
All the outlining's done, so onto the filling in.
I'm starting with the stems, in the same shade of green, Madeira stranded cotton no. 1410, as used when outlining them. No shading here, just filling in the full stem in the one colour using long and short stitch.
There are ten sets of stems in total, and here's the first five:
And the rest:

It makes quite a difference! Onto the broom flowers next.
I'm starting with the stems, in the same shade of green, Madeira stranded cotton no. 1410, as used when outlining them. No shading here, just filling in the full stem in the one colour using long and short stitch.
There are ten sets of stems in total, and here's the first five:
And the rest:
It makes quite a difference! Onto the broom flowers next.
Wednesday, 11 February 2015
Plantagenet Wreath - outlining the roses
The last bit of outlining, this time for the roses.
These are quite fiddly, involving three stages and colours:

That pink shade will actually come into its own later; for the outlining I'm using the yellow and off-white, and the darkest of the three shades of green we looked at earlier.
Firstly, the centres of the roses, in a slightly darker yellow than the broom flowers, Madeira stranded cotton no. 0106:

Next, the roses themselves, in no. 2402:

And finally the little green leaves between the rose petals, in no. 1412:

So that's everything outlined - I can start filling in the colour next. I'm looking forward to it!
These are quite fiddly, involving three stages and colours:
That pink shade will actually come into its own later; for the outlining I'm using the yellow and off-white, and the darkest of the three shades of green we looked at earlier.
Firstly, the centres of the roses, in a slightly darker yellow than the broom flowers, Madeira stranded cotton no. 0106:
Next, the roses themselves, in no. 2402:
And finally the little green leaves between the rose petals, in no. 1412:
So that's everything outlined - I can start filling in the colour next. I'm looking forward to it!
Wednesday, 4 February 2015
Plantagenet Wreath - outlining the flowers
The stems are outlined, and next it's the broom flowers. These have a small pale green cap at the base, which are going to be worked in the lightest shade of the greens we looked at last time, 1401.
There are 100 broom flowers - that doesn't have any significance, it's just a result of having quite a formal layout for the design. It does mean I can quite easily keep a mental note of the percentage of flowers completed, though!
The little caps outlined:

The flowers themselves are in a strong yellow, no. 0104:

The flowers themselves outlined:

The layout for the flowers is regular but the flowers themselves are not: they were all drawn separately and are all slightly different sizes and positions, to give a more organic look. I want the look of this piece to be formal but not rigid.
Just the outline for the roses to go.
There are 100 broom flowers - that doesn't have any significance, it's just a result of having quite a formal layout for the design. It does mean I can quite easily keep a mental note of the percentage of flowers completed, though!
The little caps outlined:
The flowers themselves are in a strong yellow, no. 0104:
The flowers themselves outlined:
The layout for the flowers is regular but the flowers themselves are not: they were all drawn separately and are all slightly different sizes and positions, to give a more organic look. I want the look of this piece to be formal but not rigid.
Just the outline for the roses to go.
Friday, 30 January 2015
Plantagenet Wreath - outlining the stems
Annoyingly, I forgot to take a photo of the fabric off the paper it had been on when it was painted and put onto a frame ready to start, so we'll just have to skip that bit and go straight to it with some stitching on.
I'm not going to be doing much in the way of shading in this project, so while I'll be using three shades of green stranded cotton, it's not with a view to producing any shaded effects with them.
Here they are:

Using the middle shade, no. 1410, I've outlined the stems in split stitch:
I'll outline the broom flowers next.
I'm not going to be doing much in the way of shading in this project, so while I'll be using three shades of green stranded cotton, it's not with a view to producing any shaded effects with them.
Here they are:
Using the middle shade, no. 1410, I've outlined the stems in split stitch:
I'll outline the broom flowers next.
Tuesday, 27 January 2015
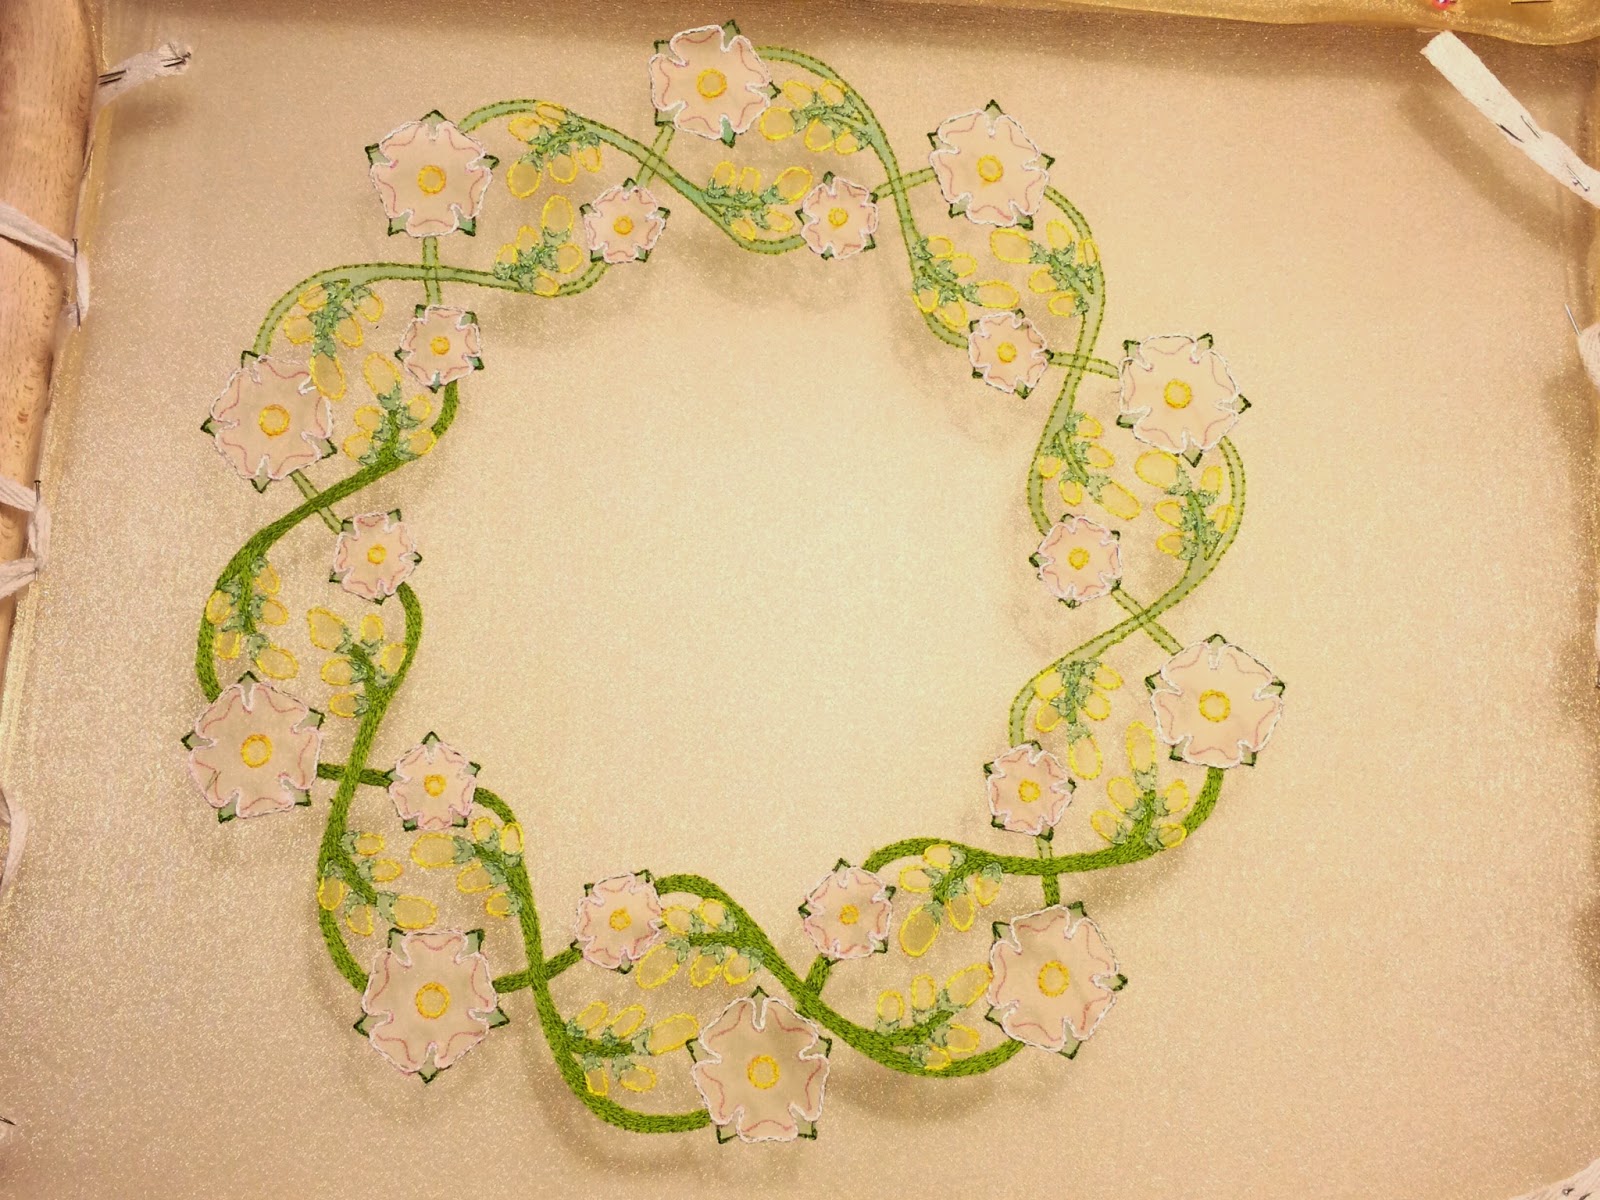
Plantagenet Wreath
I am something of an amateur history buff. I'll happily read books or watch TV programmes about just about any historical period, though there's something fascinatingly ghastly about the Middle Ages, and I recently read The Plantagenets by Dan Jones, which I can very much recommend. I'm also a big Shakespeare fan. Last autumn, I was lucky enough to see the RSC productions of Henry IV Parts I and II, which were just wonderful, and over the Christmas holidays watched my DVDs of the BBC's marvellous Hollow Crown productions of Richard II to Henry V. All this has left me wanting to stitch something.
And here that 'something' is:

This is a stylised wreath design, 28cm (11") in diameter, with its underlying structure formed by two overlapping circular sine waves, which will form stems. The flowers themselves are roses and broom - planta genista - the original emblem of the Plantagenet family and the source of their name.
Traced onto gold organza in colour:

I'm going for a Yorkist version here so the roses are going to be white, but I need to be able to see the outline so I traced them in red as the finished embroidery will be appliquéd onto a dark red velvet. If I do a companion Lancastrian version then the roses will of course be red.
The traced design without the drawn version behind it:
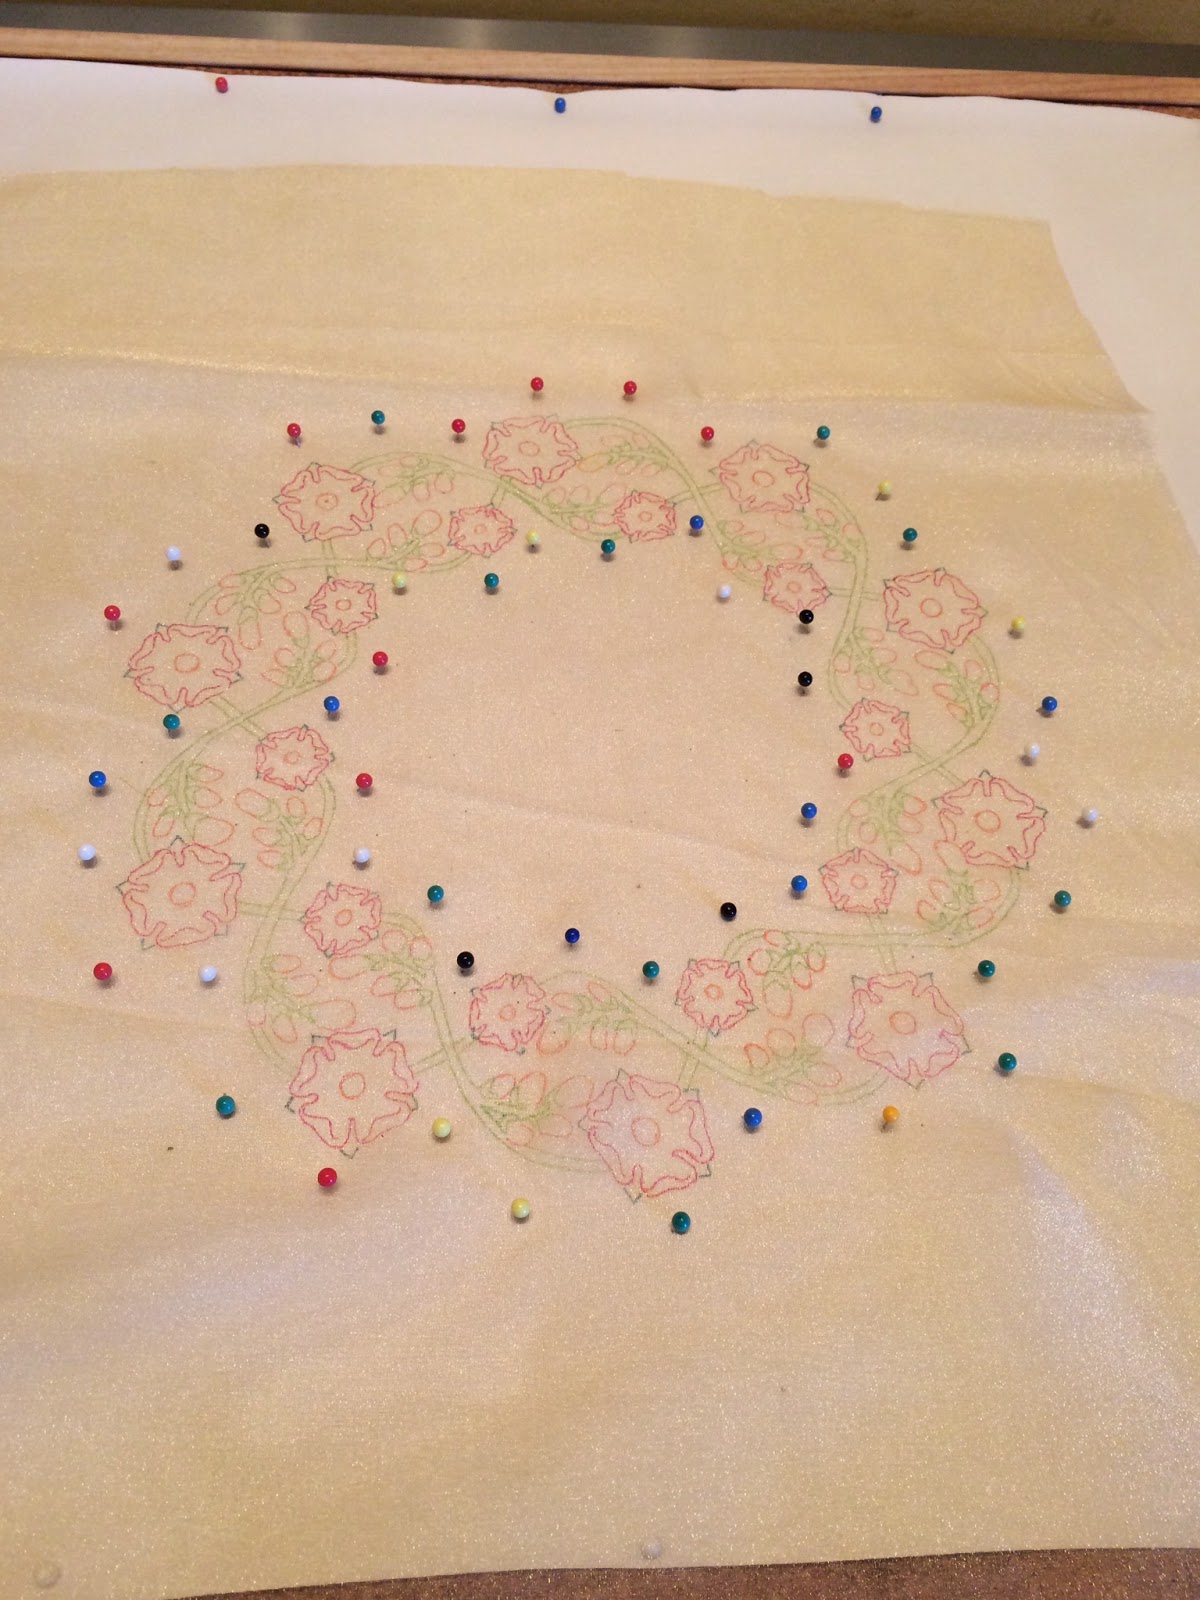
Painted:

I'll start the outlining next time.
And here that 'something' is:
This is a stylised wreath design, 28cm (11") in diameter, with its underlying structure formed by two overlapping circular sine waves, which will form stems. The flowers themselves are roses and broom - planta genista - the original emblem of the Plantagenet family and the source of their name.
Traced onto gold organza in colour:
I'm going for a Yorkist version here so the roses are going to be white, but I need to be able to see the outline so I traced them in red as the finished embroidery will be appliquéd onto a dark red velvet. If I do a companion Lancastrian version then the roses will of course be red.
The traced design without the drawn version behind it:
Painted:
I'll start the outlining next time.
Sunday, 25 January 2015

Tuesday, 20 January 2015
Shaded snowdrop - cutting out and making up
Having painted the pack of the finished embroidery with diluted PVA glue and left it overnight to dry, I cut out the snowdrop:

I'm getting used to dealing with the fiddly shape by now!
This time, I'm applying it to a green velvet background, for a complete contrast with the previous snowdrops. I used one strand of the appropriate shades to stitch it down around the edges, tucking any wisps of the organza under as far as possible:

And trimmed and finished with a backing fabric, to neaten it up:

I think that's it for snowdrops for the time being, but I do thinks it's a pretty design. It's worked well in the three different ways I've done it, and I'm sure would lend itself to other interpretations too.
I'm getting used to dealing with the fiddly shape by now!
This time, I'm applying it to a green velvet background, for a complete contrast with the previous snowdrops. I used one strand of the appropriate shades to stitch it down around the edges, tucking any wisps of the organza under as far as possible:
And trimmed and finished with a backing fabric, to neaten it up:
I think that's it for snowdrops for the time being, but I do thinks it's a pretty design. It's worked well in the three different ways I've done it, and I'm sure would lend itself to other interpretations too.
Friday, 16 January 2015
Shaded snowdrop - stems
Just the stems to go. Using the lighter of the two shades of green, Madeira no. 1410, I added a few stitches in highlight areas:

I then extended these areas using one strand of 1410 and one of the darker shade, 1411:

I then filled in the rest in 1411:

Finished! Cutting out and making up next.
I then extended these areas using one strand of 1410 and one of the darker shade, 1411:
I then filled in the rest in 1411:
Finished! Cutting out and making up next.
Tuesday, 13 January 2015
Shaded snowdrop - flowers and roots
With the outline done, time to start filling in. The snowdrop flowers first, using Madeira stranded cotton no. 2402. I'm not doing any shading here, just the off-white:

The stems and leaves are going to be slightly more involved so I'll come back to them; roots next to get them out of the way:
The roots are in no. 2114, and again don't have any shading. I am going to use some shading on the stems and leaves, though, and I'll start that next.
The stems and leaves are going to be slightly more involved so I'll come back to them; roots next to get them out of the way:
The roots are in no. 2114, and again don't have any shading. I am going to use some shading on the stems and leaves, though, and I'll start that next.
Thursday, 8 January 2015
Shaded snowdrop sample - outlining
With the design marked onto the fabric, it's time to start stitching. This time, I'm going for naturalistic colours:

That's Madeira stranded cotton no. 2402 (off white) for the snowdrop flowers, 1410 and 1411 for the leaves and stems, and 2114 for the roots.
I outlined the flowers with spilt stitch first:

It's not that easy to see in the photo, but the flowers are outlined, honestly!
Then the stems and leaves, using the darker of the two greens, 1411:

Then finally the roots:

I'll start filling everything in next.
That's Madeira stranded cotton no. 2402 (off white) for the snowdrop flowers, 1410 and 1411 for the leaves and stems, and 2114 for the roots.
I outlined the flowers with spilt stitch first:
It's not that easy to see in the photo, but the flowers are outlined, honestly!
Then the stems and leaves, using the darker of the two greens, 1411:
Then finally the roots:
I'll start filling everything in next.
Sunday, 4 January 2015
Shaded snowdrop sample
Happy new year everyone! I hope you all had a great holiday and are now raring to go.
I'm starting the new year much as I finished the old one, with the snowdrop design, though for the last time (probably). This final time, I'm going to do it in colour.
So, here we go! Tracing the design onto silver organza:

Painting with diluted acrylic paints:

The green of the stems ran a bit into the brown of the roots, but never mind - it'll be covered with stitches.
Off the paper it had been pinned onto, and stretched onto a frame:

Stitching next!
I'm starting the new year much as I finished the old one, with the snowdrop design, though for the last time (probably). This final time, I'm going to do it in colour.
So, here we go! Tracing the design onto silver organza:
Painting with diluted acrylic paints:
The green of the stems ran a bit into the brown of the roots, but never mind - it'll be covered with stitches.
Off the paper it had been pinned onto, and stretched onto a frame:
Stitching next!
Subscribe to:
Posts (Atom)


