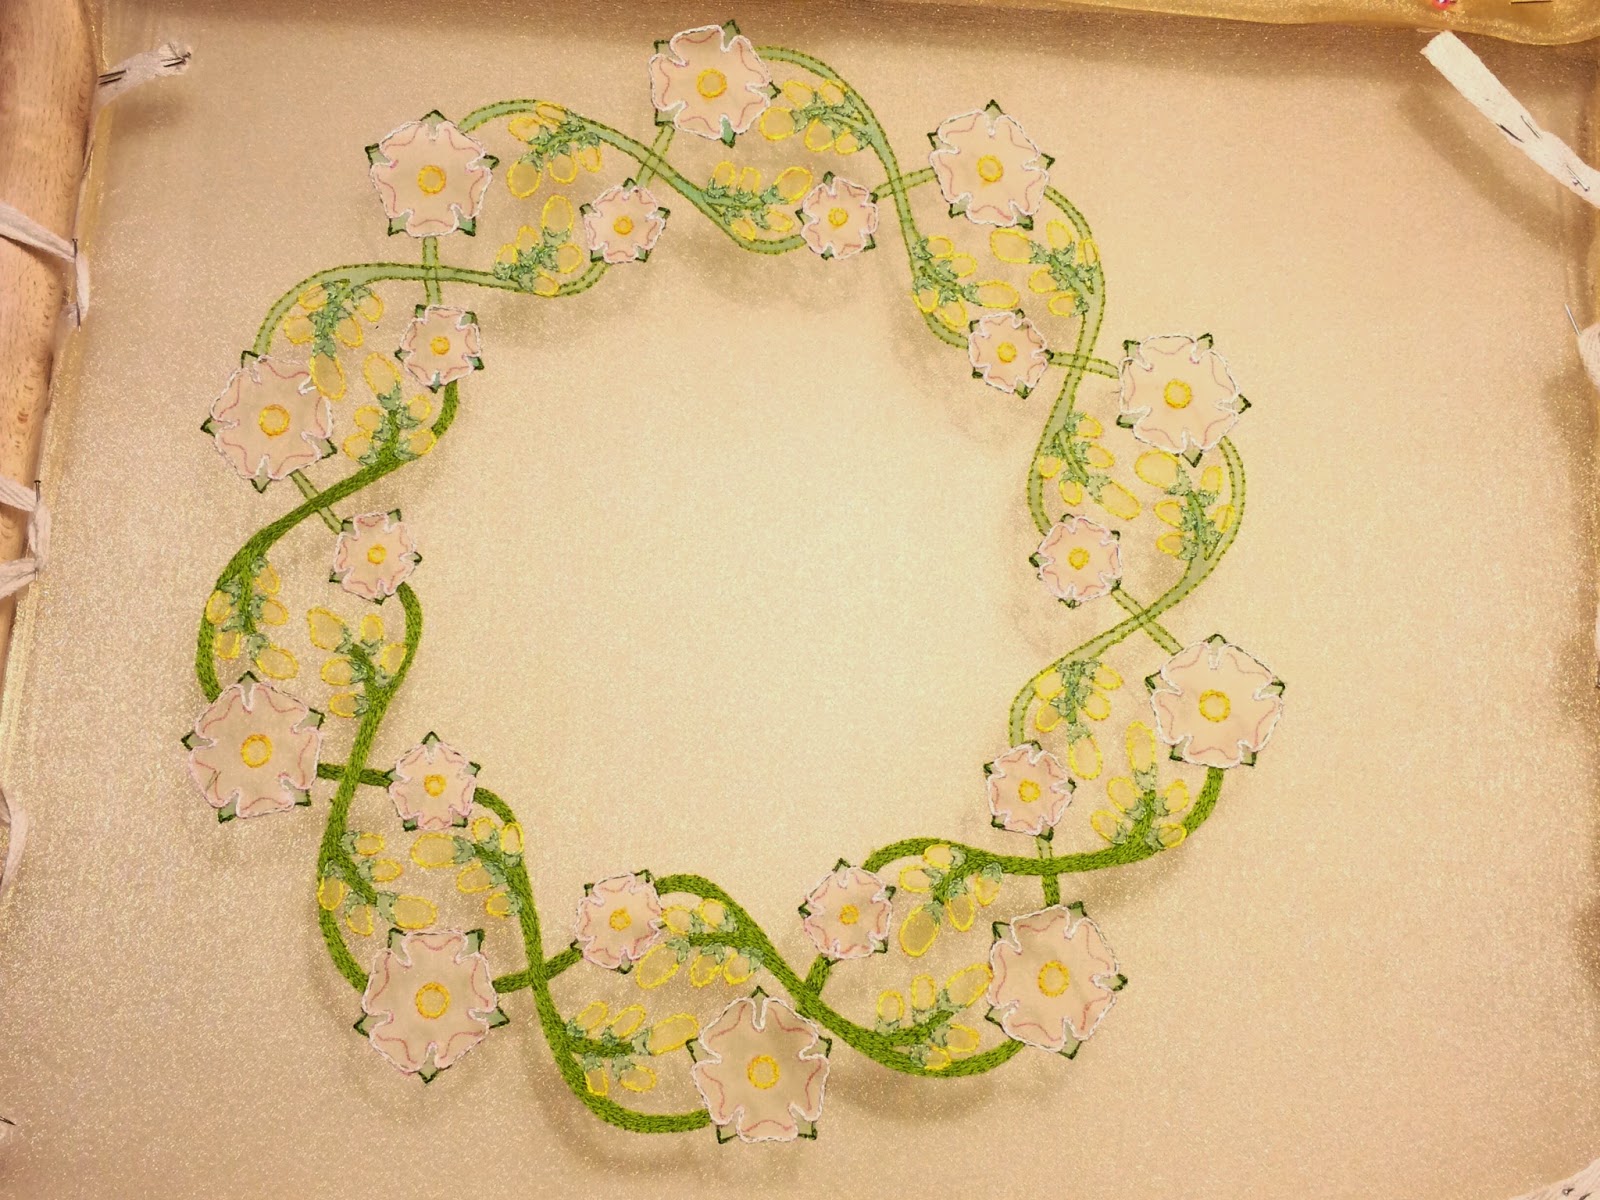
The roses are finally finished! Sorry that they've taken so long, but I got there in the end.
Last time, I'd filled in half of the 20 roses; I've now done them all, and here they are:
They're not quite finished, though: the little green leaves (or whatever the correct name is - does anyone know?) still need to be completed.
And here they are!
That's all the embroidery - now I need to cut it out. Now that's going to be fiddly.
Showing posts with label Surface embroidery. Show all posts
Sunday, 29 March 2015
Thursday, 19 March 2015
Plantagenet Wreath - stitching the roses
Still slow progress on the roses, though I am getting there. In the mean time, here's a closer look at stitching one individual rose.
The shading is already done, of course, so here I'm just filling in the rest with the off-white.
This is one of the larger roses, so there's a bit more stitching involved to fill it all in but the principle is the same for both. Firstly, I did all the rose petal 'lips', the bits that fold over at the top:
Before starting on the rest of the petals, I make life a bit easier for myself by putting in stitches to show where each petal starts and finishes:
I then went right round the rose adding a layer of long and short stitches:
And then round a second time, filling in the rest:
One more rose finished! Still quite a few to go though...
The shading is already done, of course, so here I'm just filling in the rest with the off-white.
This is one of the larger roses, so there's a bit more stitching involved to fill it all in but the principle is the same for both. Firstly, I did all the rose petal 'lips', the bits that fold over at the top:
Before starting on the rest of the petals, I make life a bit easier for myself by putting in stitches to show where each petal starts and finishes:
I then went right round the rose adding a layer of long and short stitches:
And then round a second time, filling in the rest:
One more rose finished! Still quite a few to go though...
Thursday, 12 March 2015
Plantagenet Wreath - roses (part II)
Other things have got in the way a bit recently, so I haven't got as far as I'd hoped with the roses. Still, I have done half of them, which is something.
And here they are, filled in with Madeira stranded cotton no. 2402:
The full wreath:
I'm going to be busy for the next couple of weeks too, but I'll do what I can, and hopefully it won't be too long before I can show you them all finished!
And here they are, filled in with Madeira stranded cotton no. 2402:
The full wreath:
I'm going to be busy for the next couple of weeks too, but I'll do what I can, and hopefully it won't be too long before I can show you them all finished!
Thursday, 5 March 2015
Plantagenet Wreath - roses (part I)
Just the roses left to embroider.
You may remember that when we looked at the colours to be used for the roses, it included a shade of pink, Madeira stranded cotton no. 0303. Although the roses are going to be (mostly) white, I'm using a bit of pink too.
The stylised rose design has a feature that I've always taken to be the top of each petal turned over a little. I need to highlight this in some way, and so as the embroidery will be applied to a dark red velvet once it's completed, I'm picking it out in a complementary shade: the pink.
I've stitched over the lines of this detail in split stitch:
And a close-up:
If this is an overhang, then there should be a bit of shadow cast underneath it onto the petal below; I'm adding this using small stitches in one strand of the pink and one of the off-white used for the outlining, no. 2402:
and in close-up again:
Next time, I'll fill in the rest of the roses.
You may remember that when we looked at the colours to be used for the roses, it included a shade of pink, Madeira stranded cotton no. 0303. Although the roses are going to be (mostly) white, I'm using a bit of pink too.
The stylised rose design has a feature that I've always taken to be the top of each petal turned over a little. I need to highlight this in some way, and so as the embroidery will be applied to a dark red velvet once it's completed, I'm picking it out in a complementary shade: the pink.
I've stitched over the lines of this detail in split stitch:
And a close-up:
If this is an overhang, then there should be a bit of shadow cast underneath it onto the petal below; I'm adding this using small stitches in one strand of the pink and one of the off-white used for the outlining, no. 2402:
and in close-up again:
Next time, I'll fill in the rest of the roses.
Thursday, 26 February 2015
Plantagenet Wreath - broom flowers
The broom flower blossoms next. No shading, just yellow.
The first fifty:
And the second:
Although the layout is quite formal, all the flowers are slightly different - I didn't want the design to be rigid, and so while the positioning is uniform, I drew each flower freehand.
Here's a close-up of one set, to see them in more detail:
It's coming along - just the roses to embroider.
The first fifty:
And the second:
Although the layout is quite formal, all the flowers are slightly different - I didn't want the design to be rigid, and so while the positioning is uniform, I drew each flower freehand.
Here's a close-up of one set, to see them in more detail:
It's coming along - just the roses to embroider.
Sunday, 22 February 2015
Plantagenet Wreath - little green caps
The broom flowers are to be filled in next, all one hundred of them, and I'm starting with the little green caps at their bases (I'm sure these have a proper botanical name but I have no idea what it is!).
These are in the lightest shade of green, Madeira stranded cotton no. 1401. The first fifty worked in satin stitch:
and all hundred:
These are rather small and not that easy to see, so here's a close-up of a set of ten:
I'm really pleased with how it's coming along, and I'm looking forward to doing the flowers themselves next.
These are in the lightest shade of green, Madeira stranded cotton no. 1401. The first fifty worked in satin stitch:
and all hundred:
These are rather small and not that easy to see, so here's a close-up of a set of ten:
I'm really pleased with how it's coming along, and I'm looking forward to doing the flowers themselves next.
Tuesday, 17 February 2015
Plantagenet Wreath - stems
All the outlining's done, so onto the filling in.
I'm starting with the stems, in the same shade of green, Madeira stranded cotton no. 1410, as used when outlining them. No shading here, just filling in the full stem in the one colour using long and short stitch.
There are ten sets of stems in total, and here's the first five:
And the rest:
It makes quite a difference! Onto the broom flowers next.
I'm starting with the stems, in the same shade of green, Madeira stranded cotton no. 1410, as used when outlining them. No shading here, just filling in the full stem in the one colour using long and short stitch.
There are ten sets of stems in total, and here's the first five:
And the rest:
It makes quite a difference! Onto the broom flowers next.
Wednesday, 11 February 2015
Plantagenet Wreath - outlining the roses
The last bit of outlining, this time for the roses.
These are quite fiddly, involving three stages and colours:
That pink shade will actually come into its own later; for the outlining I'm using the yellow and off-white, and the darkest of the three shades of green we looked at earlier.
Firstly, the centres of the roses, in a slightly darker yellow than the broom flowers, Madeira stranded cotton no. 0106:
Next, the roses themselves, in no. 2402:
And finally the little green leaves between the rose petals, in no. 1412:
So that's everything outlined - I can start filling in the colour next. I'm looking forward to it!
These are quite fiddly, involving three stages and colours:
That pink shade will actually come into its own later; for the outlining I'm using the yellow and off-white, and the darkest of the three shades of green we looked at earlier.
Firstly, the centres of the roses, in a slightly darker yellow than the broom flowers, Madeira stranded cotton no. 0106:
Next, the roses themselves, in no. 2402:
And finally the little green leaves between the rose petals, in no. 1412:
So that's everything outlined - I can start filling in the colour next. I'm looking forward to it!
Wednesday, 4 February 2015
Plantagenet Wreath - outlining the flowers
The stems are outlined, and next it's the broom flowers. These have a small pale green cap at the base, which are going to be worked in the lightest shade of the greens we looked at last time, 1401.
There are 100 broom flowers - that doesn't have any significance, it's just a result of having quite a formal layout for the design. It does mean I can quite easily keep a mental note of the percentage of flowers completed, though!
The little caps outlined:
The flowers themselves are in a strong yellow, no. 0104:
The flowers themselves outlined:
The layout for the flowers is regular but the flowers themselves are not: they were all drawn separately and are all slightly different sizes and positions, to give a more organic look. I want the look of this piece to be formal but not rigid.
Just the outline for the roses to go.
There are 100 broom flowers - that doesn't have any significance, it's just a result of having quite a formal layout for the design. It does mean I can quite easily keep a mental note of the percentage of flowers completed, though!
The little caps outlined:
The flowers themselves are in a strong yellow, no. 0104:
The flowers themselves outlined:
The layout for the flowers is regular but the flowers themselves are not: they were all drawn separately and are all slightly different sizes and positions, to give a more organic look. I want the look of this piece to be formal but not rigid.
Just the outline for the roses to go.
Friday, 30 January 2015
Plantagenet Wreath - outlining the stems
Annoyingly, I forgot to take a photo of the fabric off the paper it had been on when it was painted and put onto a frame ready to start, so we'll just have to skip that bit and go straight to it with some stitching on.
I'm not going to be doing much in the way of shading in this project, so while I'll be using three shades of green stranded cotton, it's not with a view to producing any shaded effects with them.
Here they are:
Using the middle shade, no. 1410, I've outlined the stems in split stitch:
I'll outline the broom flowers next.
I'm not going to be doing much in the way of shading in this project, so while I'll be using three shades of green stranded cotton, it's not with a view to producing any shaded effects with them.
Here they are:
Using the middle shade, no. 1410, I've outlined the stems in split stitch:
I'll outline the broom flowers next.
Friday, 16 January 2015
Shaded snowdrop - stems
Just the stems to go. Using the lighter of the two shades of green, Madeira no. 1410, I added a few stitches in highlight areas:
I then extended these areas using one strand of 1410 and one of the darker shade, 1411:
I then filled in the rest in 1411:
Finished! Cutting out and making up next.
I then extended these areas using one strand of 1410 and one of the darker shade, 1411:
I then filled in the rest in 1411:
Finished! Cutting out and making up next.
Tuesday, 13 January 2015
Shaded snowdrop - flowers and roots
With the outline done, time to start filling in. The snowdrop flowers first, using Madeira stranded cotton no. 2402. I'm not doing any shading here, just the off-white:
The stems and leaves are going to be slightly more involved so I'll come back to them; roots next to get them out of the way:
The roots are in no. 2114, and again don't have any shading. I am going to use some shading on the stems and leaves, though, and I'll start that next.
The stems and leaves are going to be slightly more involved so I'll come back to them; roots next to get them out of the way:
The roots are in no. 2114, and again don't have any shading. I am going to use some shading on the stems and leaves, though, and I'll start that next.
Thursday, 8 January 2015
Shaded snowdrop sample - outlining
With the design marked onto the fabric, it's time to start stitching. This time, I'm going for naturalistic colours:
That's Madeira stranded cotton no. 2402 (off white) for the snowdrop flowers, 1410 and 1411 for the leaves and stems, and 2114 for the roots.
I outlined the flowers with spilt stitch first:
It's not that easy to see in the photo, but the flowers are outlined, honestly!
Then the stems and leaves, using the darker of the two greens, 1411:
Then finally the roots:
I'll start filling everything in next.
That's Madeira stranded cotton no. 2402 (off white) for the snowdrop flowers, 1410 and 1411 for the leaves and stems, and 2114 for the roots.
I outlined the flowers with spilt stitch first:
It's not that easy to see in the photo, but the flowers are outlined, honestly!
Then the stems and leaves, using the darker of the two greens, 1411:
Then finally the roots:
I'll start filling everything in next.
Wednesday, 22 October 2014
Acanthus leaf sample - a bit of shading
Dear me, it's been a long time since my last post - I've been rather busy with other, non-sewing, things, so sorry about that. I'm getting back to my stitching now, though, so things should get back to normal soon.
I've made a start on adding some colour, starting with the darkest shade, Madeira 1912, at the edges of the leaves:
I then started the shading, adding some more stitching using one strand of 1912 and one of 1910:
More shading next.
I've made a start on adding some colour, starting with the darkest shade, Madeira 1912, at the edges of the leaves:
I then started the shading, adding some more stitching using one strand of 1912 and one of 1910:
More shading next.
Labels:
Long and short stitch,
Shading,
Surface embroidery
Thursday, 3 July 2014
Apple tree fire screen - finally completing the stem shading
It's taken a while, but the reworked shading on the stems - and so all of the embroidery - has been finished.
Here's half of the stems redone:
And the rest:
It's made a big difference, and I'm glad I decided to over-stitch the too-pale bits.
So that's all the embroidery done. The next stage in the process is not something I've done before, and it's making me very nervous. Wish me luck!
Here's half of the stems redone:
And the rest:
It's made a big difference, and I'm glad I decided to over-stitch the too-pale bits.
So that's all the embroidery done. The next stage in the process is not something I've done before, and it's making me very nervous. Wish me luck!
Saturday, 28 June 2014
Apple tree fire screen - stem shading update
As I mentioned before, I wasn't at all happy about the shading, or lack of it, for the stems, and needed to do something to improve them. Well, I think I have! Or started to anyway - there's still a lot of stem to do.
Still, I'm happy with the approach. I over-stitched the pale areas in a couple of stems at the top first with one strand of the middle shade, 2211, and then stitched over that with one strand of the darkest, 2213.
Here's the result:
I'm far happier with that, which is a relief. I'll now go on and do the rest the same way.
Still, I'm happy with the approach. I over-stitched the pale areas in a couple of stems at the top first with one strand of the middle shade, 2211, and then stitched over that with one strand of the darkest, 2213.
Here's the result:
I'm far happier with that, which is a relief. I'll now go on and do the rest the same way.
Wednesday, 25 June 2014
Apple tree fire screen - all the stems filled in
Sorry for the long gap between posts: blame a combination of being busy at work and watching the World Cup.
Well I've (finally) completed the stems, and here they are:
I say 'completed', but the shading really isn't working at all and something needs to be done about that. I have an idea what to do, but I'll have to try it and see if it works. Let's hope so!
Wednesday, 11 June 2014
Apple tree fire screen - half the stems filled in
I've got half of the stems filled in in Madeira stranded cotton 2213, and I have to say it's not looking like I'd wanted it to.
Here's the loop at the top:
Hmmm... it's not right, is it.
Giving it the benefit of the doubt, I carried on:
No, definitely not right. The palest shade looks too pale, far paler than it does in the packet, and the transitional shading between it and the darkest one is hardly noticeable at all.
Something is going to have to be done about this, but I don't want to start any remedial work on half of it, as it could end up looking unbalanced: better to complete the stems, and then sort them all out in one go, when I can see how the full piece is working.
Or that's the plan, anyway. We'll see how it goes.
Here's the loop at the top:
Hmmm... it's not right, is it.
Giving it the benefit of the doubt, I carried on:
No, definitely not right. The palest shade looks too pale, far paler than it does in the packet, and the transitional shading between it and the darkest one is hardly noticeable at all.
Something is going to have to be done about this, but I don't want to start any remedial work on half of it, as it could end up looking unbalanced: better to complete the stems, and then sort them all out in one go, when I can see how the full piece is working.
Or that's the plan, anyway. We'll see how it goes.
Saturday, 7 June 2014
Apple tree fire screen - more shading on the stems
I've added a bit more shading, and have gone round the edge of all the stitching on the stems in one strand of 2211, the middle shade, and another of 2213, the darkest of the three:
Next time, I'll fill in the rest in 2213.
Thursday, 5 June 2014
Apple tree fire screen - stitched stems
After my failed attempt to use Italian tubular mesh ribbon for the stems, I've reverted to regular stitching for them. What a relief!
I'm using three shades of Madeira stranded cotton, 2208, 2211 and 2213:
I outlined the edge of the stems with the darkest of the three, 2213, in split stitch rather than stem stitch as I just like it better:
As the apples are highlighted as though with light coming from the right, the highlighting on the stems needs to work in the same way, so I drew on lines where the highlights should go (no photo, sorry). Using two strands of the lightest shade of the three, 2208, I then added a couple of rows of split stitch in the 'highlight' areas:
For some reason it looks far lighter on the piece than it does in the packet!
To start to blend the shading in, I next went round the first set of stitches with another row, this time with one strand of 2208 and one of the middle shade, 2211:
More shading next time.
I'm using three shades of Madeira stranded cotton, 2208, 2211 and 2213:
I outlined the edge of the stems with the darkest of the three, 2213, in split stitch rather than stem stitch as I just like it better:
As the apples are highlighted as though with light coming from the right, the highlighting on the stems needs to work in the same way, so I drew on lines where the highlights should go (no photo, sorry). Using two strands of the lightest shade of the three, 2208, I then added a couple of rows of split stitch in the 'highlight' areas:
For some reason it looks far lighter on the piece than it does in the packet!
To start to blend the shading in, I next went round the first set of stitches with another row, this time with one strand of 2208 and one of the middle shade, 2211:
More shading next time.
Subscribe to:
Posts (Atom)