Sunday, 30 August 2009

Machine embroidered bookmark

I can't do anything else on the banner until the linen arrives, so I can spend a bit of time catching up with other things. I need to put calico backs on each of the 4" rainbow squares, I ought to put loops for the pole on the back of the banner toile, and I probably should do the ironing. So I decided to make a machine embroidered bookmark instead!

I don't do much machine embroidery, and a real machine embroiderer like Michala at Kayla Coo should probably look away now, but it's fun to do for a change. As you may have gathered by now, most of my work is meticulously planned, so it's refreshing to do something freer. No marked up designs! No transfers! Not even any sketches - just make a start and see what happens.

I had a go at this bookmark a while ago, and I've never been happy with the front, though I quite liked the back. The front was trying to do too much - as well as machine embroidery it had appliqued silver kid and painted leather, and it was all too heavy for a small piece.

I decided to redo the front in a much simpler style, based on what I'd done previously for the back. Using silk satin I'd spaced dyed using Dylon Cold Bahama Blue and Turquoise Saga (if I can read my own handwriting - I wrote this down a while ago), with a piece of felt cut to shape on the back, I free-machined a series of loops along the length in Sulky 1090.

I then stiched another series of loops, rather closer together, over the top, using Sulky 1095. This then matched the back of the original bookmark.

The small patch of sewing at the top of the frame is a test piece, where I can make sure that what I'm planning will actually work before I have a go on the real thing. It also helps make sure I've got the sewing machine threaded up properly, and believe me, that's always worth testing!

When getting out the threads from the blue thread drawer (of course they're colour-coded!), I came across some dark turquoise lurex cord, so I laid that across the stiched loops, and couched it down using zig-zag stitch.

I then finished it off with some small circles done in zig-zag stitch again, using Sulky 7001 (silver).

For the original version, I'd made some cords and little beaded tassles, which I've reused. They're mostly made from stranded cotton dyed at the same time as the fabric, but with a small amount of silver and some soft green in. The green went a lot better with the previous one than this, but never mind, it looks ok. I then ladder-stitched the two halves together and - here it is:

I'm quite pleased with it. If I'd made it from scratch, I think I'd have made it a bit bigger, and I'd have made sure the cord matched properly, but on the whole I think it's turned out pretty well. I might make more!

Wednesday, 26 August 2009

More flower transfers

As I've been making transfers of the flowers on the banner design, I've needed to do a bit of simplification. The individual flowers and leaves that make up the foxgloves and ferns get smaller and smaller until they disappear; this works well on paper, but isn't practical to embroider, especially as I'm planning on working the flowers on linen, cutting them out and applying them to the background fabric. So, I've simplified them slightly as I've gone along.

In the foxglove picture here, you can see the original, and my transfer. The ones lower down are the same, but after a certain point when they got too small, I did a couple joined together rather than separate left and right of the stem, and then decided to leave it at that. Any smaller, and I think it would be too awkward to be workable.

I've also tried to add a few differences between the flowers. All the flowers of each type are identical, though in varying sizes; I think it'll look more natural if they vary a bit. Having said that, when I'm tracing them by hand, I don't think I could get them all the same if I tried, so I may as well make a virtue out of it!

Monday, 24 August 2009

York Minster - the Great Processional Banner

It's always interesting to see how others have done something, and when it comes to processional banners, they don't come any better than this.

I went for a visit to York Minster recently, to have a look at some of their ecclesiastical embroidery. I was fortunate to be able to speak to two very knowledgeable ladies from the York Minster Broderers, who gave me a tour of the embroideries on public display, and some very useful hints and tips.

York Minster is currently undergoing extensive restoration work, and a lot of their textiles are in storage while the building work is carried out, so I was unable to see a series of contemporary processional banners made in the 1990s, but I was able to see this, the star of the show, and one of the finest pieces of early 20th century embroidery in the country.

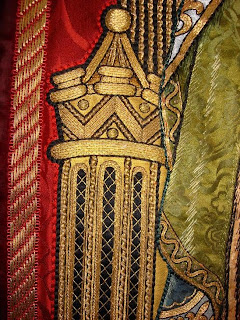
The descriptively-named Great Processional Banner is an absolutely fabulous piece of craftsmanship. Dedicated in 1916, this was made by Watts & Co in London, and there must be months if not years of work in it.


It's huge - about 8 feet long by 4 feet wide, and takes two strong men to carry. There's a lot of beautiful goldwork - couched gold thread - involved, but I was particularly interested to have the chance to examine the other techniques used. The faces are exquisitely worked in silk in long and short stitch and split stitch, giving a marvellous expressive effect, as in this image of St Cuthbert.

A lot of it, though, is appliqué embellished with embroidery. In this detail of St Peter's robe, you can see that it's made of green damask applied to the background, with some quite large stitches in shades of green onto it, to give the effect of folds.

As I'm planning on using goldwork, appliqué and split stitch myself on St Cuthbert's Banner, I was fascinated to see how this was done. I was especially interested to see the size of some of the stitches, which were an inch or so long. I often work at quite a small scale, which I enjoy, but there are some cases when stitches that can be measured in millimetres aren't necessarily appropriate. When working on a piece that's designed to have an impact when viewed from the back of a cathedral, you can go a little larger!

Saturday, 22 August 2009

Flower transfers

Continuing with the prep work, I've started making transfers for the flowers that'll appear all the red panels on the front of the banner. I'm doing this with an iron-on transfer pencil - tracing the design with the transfer pencil, ready to iron onto linen for stitching.

There is a complication, though: when you create a transfer of something, you turn the transfer over and place it face down against the fabric to iron on, which means that the design is reversed. In some cases, such as the central cross which is symmetrical, this doesn't matter, but the flowers aren't, so it does.

So, I first trace the design using an ordinary pencil.


The traced elements, the cowslip design in this case, have been spaced out a lot more than they appear on the original - I'll explain why in a moment.

I then turn the traced version over, and trace it again, this time with the transfer pencil.


This gives a reversed design, that when ironed onto the fabric will appear the right way round again.

The reason why the various parts of the design are spaced apart on the transfer is that I'm not embroidering the flowers directly onto the velvet that'll make up the banner, as stitching onto a pile fabric like velvet isn't easy - the stitches tend to disappear into the pile. I'm stitching them onto linen, then cutting them out (very carefully!) and applying them to the velvet. I need to leave enough space between the parts of the design, to make this possible.

I'll give more details on this process, once I get that far!

Thursday, 20 August 2009

Velvet!

The velvet's arrived!

It's cotton velvet - we looked at 100% silk velvet (not silk/rayon mix, which I find awful to work with), but to get it in the right colour, and with a dense enough pile, was so appallingly expensive, that we opted for cotton instead. I'd have been terrified to cut the silk velvet, as any mistakes would have been so costly. I don't feel so bad about the cotton.

The white is for the central panel, and the red is for the outer sections, points, sleeves, and the central cross, which will be appliqued. You can get an idea of what it'll look like from the toile.

Inevitably, the materials I need are all arriving in reverse order. I need the linen first, to transfer the cross design onto and to back the velvet, so of course that's the last to arrive. I do have linen in my fabric cupboard, but I'm going to need quite a lot, and I feel I ought to use all the same. I worry that if use different weights, it might distort or shrink or something. Best to keep it all the same. I'll just have to be patient!

Tuesday, 18 August 2009

St Cuthbert's Banner - toile


Here's a toile I made of the banner a couple of months ago. It's full size - a yard square, plus bits top and bottom. It's made from cotton sheeting, with the central cross attached with machine zig-zag stitch in gold.

I wanted to make a mock-up of the banner for a few reasons: it was helpful for me to work out the construction, especially mitring the corners; I thought it might be helpful for other people to see it full size, as not everyone can picture it from the description; and as someone is going to make the pole for it, it would help them to make sure everything fit.

This is just hung from a metre ruler suspended from the doors of the fabric cupboard in my workroom, but the real one will have a pole through the tabs along the top, and a vertical pole attached to it in a T shape for carrying. To cater for this, I've left a gap in the tabs (or 'sleeves', technically) for the upright pole to attach. I haven't added them yet, but there'll also need to be a couple of loops on the back for the pole to go through, to stop the banner flapping about.

The eagle-eyed amongst you may have noticed that there are seven points along the bottom, while the description specified five. This is because 36" seemed to divide naturally into six - five full sized points, then one at either end half size. Unfortunately, I didn't go back and check the description until I'd already done it, and found that while it may have seemed natural to me, it evidently didn't to whoever made the original. I'll have to resize them for the real thing.

Sunday, 16 August 2009

Central cross - transfer


Here's Fiona's design, taped to my drawing board. The paper was a bit wider than the board, so I've trimmed it (badly), but the design is unaffected.

I've started on some prep work, ready for the fabric arriving. I've decided to do the central crosses first - that's crosses plural, as there's one on both the front and back. I've traced the cross with a transfer pencil, ready to iron on to the linen when it arrives. This will be used to back the white velvet, and I'll go over the design with small running stitches to get it onto the front (more details on how to do this in my article, Transferring your embroidery design onto fabric).

Here's the transfer, taped to the original, which shows a bit more detail, including a dotted line a little outside the line on the design.

The finished banner will be 36" wide (as an aside, I generally prefer to work in metric, but as the description was very precise about the measurements, I'm sticking to Imperial measurements for this project), but after being printed out on the biggest piece of paper the copy shop had, it came out as 33" wide, so I'm going to have to resize things a bit, or at least spread them apart a little. In this case, I'm keeping the cross the same size as the printed design, but on a slightly larger (18") square - I needed to find the centre of the square it's in on the design, and line it up to the centre of a pre-drawn 18" square on the tracing paper. As this will give it a bit more of a margin all round, it'll give me a bit more leeway and should still look fine.

Saturday, 15 August 2009

St Cuthbert's Banner


I mentioned before that I'm starting work on a big new project. I'm thirlled to be able to tell you that this is a commission from the Northumbrian Association to make a replica of a lost Medieval processional banner dedicated to St Cuthbert, for presentation to Durham Cathedral. This a major project, and I'm really excited to be involved.

There are no suviving images of the original, which didn't survive the Reformation, but there's a very good description in the Rites of Durham. This is a bit long, and idiosyncratically spelled, but it's very important to the work I'm going to be doing for the next few months, so bear with me:

"The banner was a yerde brode, and five quarters deape, and the nether part of it was indented in five parts, and frenged, and maid fast withall about with read silk and gold. And also the said banner cloth was maid of read velvett, of both sydes most sumptuously imbroidered and wrought with flowers of grene silk and gold. And in the mydes of the said banner cloth was the sayde holie Relique and Corporax cloth inclosed and placed therein, which Corporax cloth was covered over with white velvett, half a yerd square every way, having a red cross of read velvett on both sides over the same holie Relique, most artificialle and cunynglye compiled and framed, being fynely finged about the edge and scirts with frenge of read silk and golde, and three Litle fyne silver bells fast to the scirts of the said banner cloth, like unto sackring bells, and, so sumptuously finished and absolutelye perfitted, was dedicated to holie Saint Cuthbert, of intent and purpose that the same which was alwaise after presented and carried to any battell, as occasion should serve; and which was never carried or showed and any battell, but, by the especiall grace of God Almightie and the mediacione of holie Saint Cuthbert, it browghte home the victorie."

So, the important bits for me are:
  • It's a yard square, with another quarter of a yard (i.e. 9") forming a series of points along the bottom, making it 3'9" (five quarters of a yard) long in total
  • It's made of red velvet
  • There's an 18" (half a yard) square of white velvet in the centre, on which is a red velvet cross
  • The red velvet panels around this are embroidered with green and yellow flowers
  • It has a red and gold fringe and silver bells along the bottom.
As an exact replica is impossible, the new version will be an interpretation of the decription, in the style and spirit of the original. For example, there's no description of the central cross, and it could have been very plain, a cross of St George. But, St Cuthbert is now closely associated with the gold and garnet pectoral cross found when his coffin was opened in the early 19th century, so the cross on this banner will be based on that.

A beautiful design featuring Northumbrian wayside flowers has been drawn by Fiona Raeside, and I just hope I can do it justice. Materials are now on order, so I should be getting under way soon. I intend to document everything I do for this project here, so keep checking back to see how I'm getting on.

Thursday, 13 August 2009

Rainbow squares - green


The last of the squares I've done as part of an Embroiderers' Guild group project, and I think my favourite. This time, the outline is chain stitch in Gutermann gold metallic thread (the sort that comes on a reel, like sewing thread, and is horrible to work with), and the filling-in is split stitch.

I like split stitch a lot and I use it quite a bit. It can give lovely textured, shaded effect, and as the stitches tend to be small, is good for small, fiddly shapes like these, where long and short stitch wouldn't work so well. Having said that, I tend to use it for larger, simple shapes too where long and short would be perfectly fine, just because I like it. And because I have a tendency to create work for myself, but never mind that.

The triple hares design is a traditional one, used across Asia and Europe - I did a project on this motif a few years ago, when I was doing City & Guilds. It first appears in Buddhist wall paintings in China, then moved along the Silk Road, arriving in Western Europe in the Middle Ages, where it was used on roof bosses and windows and the like in churches. More recently, the hare has become an important emblem in modern Paganism, and this ancient design is having a new lease of life!

Tuesday, 11 August 2009

Rainbow squares - red


The second of the squares I've done. 4" square again, and more goldwork, but really in gold this time. The trunk and stems are in couched no. 8 Jap gold thread, and the leaves in rough purl and bright check purl. The trunk is worked on one layer of yellow felt, and the leaves on two layers, to pad them out nicely and give a 3D effect.


I think this design would look good in crewel work - I should give that a go some time.

Monday, 10 August 2009

Rainbow squares - blue

As a group project, all the branches of the Embroiderers' Guild in the North East Region are currently working on rainbow squares. These are 4" squares in rainbow colours, to be worked in any technique.


Each branch is doing things slightly differently, but my branch, Sunderland, is covering all the colours. All members have been asked to do at least two squares in any colour(s) they like, though the Committee have dyed fabric ready, so that there'll be a unified look. Once finished, the individual squares will be stitched together in strips, to form a 'rainbow'.


So, after the explanation, here's my blue square. It's on the space-dyed calico provided by the branch, and is worked in couched silver no. 8 Jap thread. The leaves are little bits of silver pearl purl, threaded like beads. I could have lined it up better when putting it on the card, though - it's too close to the top. I ought to take it off and do it again, but I have a feeling I'm not going to!

Sunday, 9 August 2009

Durham Cathedral visit


I took a trip over to Durham yesterday, and had a good look round the Cathedral. It's just a few miles from where I live so I've been there a lot over the years, but it's always worth a visit. I particularly wanted to see their ecclestiastical embroidery; they don't have much on display, but what they do have out is stunning. (I would show you, but I wasn't allowed to take photos. They don't allow any photography inside the Cathedral at all, in stark contrast to York Minster, where you can snap away to your heart's content.)

Anyway, despite the lack of pics, I had a great time, after being treated to a personal guided tour by the senior steward, Marion. She's amazingly knowledgeable, and gave me far more information than I can remember.

Most of the embroidery is made by the Cathedral Broderers, a dedicated band of talented but largely unsung ladies. There are also a couple of batik hangings by Thetis Blacker; not a technique I know much about, but it's certainly effective.

Brand new blog!

This is my brand new - and very first - blog. I'm a bit late to the party, I know, but never mind, I got here eventually. The plan is to keep a diary of work in progress, especially a big commission I've just started work on (of which more in future posts), so we'll see how it all goes. I also intend working on the blog design as I go along, so maybe it'll look a bit different next time you visit, until I find a look I like.