Tuesday, 16 November 2010

Some improvisation

Or cheating, if you prefer. I said last time that something was worrying me about the cowslip flowers; the problem wasn't with the flowers as such, but with the spaces between them.  As you may recall, all the flowers are going to be cut out and applied to the red velvet that will form the Banner panels.  Some of the shapes, especially the cowslips, are going to be tricky enough as it is, but the little gaps are even worse.

If you're not sure what I mean, have a look at what the arrow is pointing at in this image:


In reality, that little gap is just a few millimetres across, and even with my pointiest scissors and my steadiest hand, cutting that out neatly is going to be a challenge, and runs the risk of catching the stitching with the point of the scissors, which I do not want to do.

So, how can I get around this?  Cheat!

The flowers are going on red velvet.  So, I got out the velvet and some red threads, and found the closest match, Madeira 0511.  I then filled in the little gaps with this:


Here are all three flower heads, with the gaps filled in in red:


Hopefully, it won't be obvious that the red here isn't actually the red of the velvet showing through, or not without getting very close and peering at it, anyway.

It also gives a tantalising hint of how the yellow and green of the flowers will look against the red of the background, which is quite exciting.  That will be starting very soon, I promise!

Monday, 15 November 2010

Cowslip flowers

The cowslip flower heads each consist of seven individual flowers; some of these are shown from the back, but the rest are seen from the front, and so partially into the interior of the 'bell' of each flower.  This needs to be a slightly darker yellow than the exterior, so I need to add some shading.

There isn't the space to do too much, so I've just used two colours.  I added a band of stitches in the darker shade, Madeira 1406, just under the buttonhole-stitched rim of the bell:


Then a band using one strand of 1406 and one of 1405 in front of it:


And finally I filled in the rest of the flowers in split stitch in 1405:


Here are all three flower heads, completed:


Trying to get a shading effect into such small spaces was quite tricky, especially the smallest one, which is only about an inch (2.5 cm) across, so I'm quite pleased with how they've turned out.  If I'd had the room, I'd probably have used three shades and made the difference between the yellow centre and the rest a bit more pronounced, but it just wasn't practical here.

There is one thing that's worrying me a bit though...

Friday, 12 November 2010

Cowslips

The very last sheet of flowers!  Well, for the bottom panel, anyway.  This one is the only appearance on the panel of the cowslip (Primula veris), though it's a bit complicated, so it's probably just as well there's just the one.


I'm doing the flowers themselves first, and will do the leaves afterwards.  It's hard to tell scale from the photos, but the smallest of the three flower heads is about an inch (2.5cm) in diameter.  In that space are seven individual flowers, with central shading, and the sepal cups that connect them to the stem.  That's a lot to pack into a very small space, and you can probably now guess why I've put them off to last.

I did the cups first, outlining them in buttonhole stitch in Madeira 1409, the very palest green that I'll be using anywhere on the Banner:


A close-up of the largest of the flower heads:


The detail on the cups was done in split stitch with three strands of 1410:


I then filled in the rest of the cups in split stitch in 1409:


And again in close-up:


The photo makes the difference in shade look more pronounced than it does in real life; the effect is actually more subtle than it looks here.

Starting on the flowers themselves, I buttonhole stitched the edges in the main yellow shade I'm using for them, 0105.  As the flowers are a sort of bell shape and aren't depicted side on, I also used a line of buttonhole stitch to define the upper rim of the bell:


The close-up might show that a bit more clearly:


The filling-in shading needs to highlight the interior of each flower - that comes next.

Monday, 8 November 2010

Completing the wood avens leaves

With the outline and the central veins done on the leaves, I now needed to fill them in using split stitch shading.

To try and give a naturalistic look, I'm working the shading from the centre, around the veins, to the edge, rather than from top to bottom or side to side, say.  To start, I added stitches in the darker shade, 1411, in the centres of the largest leaves:


I then added a band of shading thread with one strand on 1411 and one of 1410 around this, and in the centres of the remaining leaves:


And in close-up:


Finally, I filled in the rest with the lighter shade, 1410:


And again in close-up:


I tried to keep the angle of the stitches radiating outwards, to try and give a sense of shape to each leaf – hopefully this makes it look a little more life-like.

I'm making this sound so easy, and I suppose the process is pretty straightforward, but there's a lot of work in these leaves!  Still, I'm making good process - the next sheet is the last one for the bottom panel.

Friday, 5 November 2010

Wood avens leaves

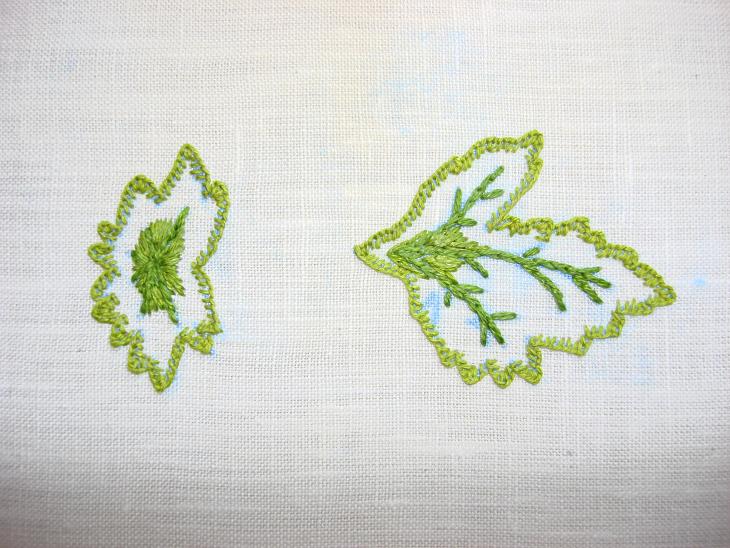
There are sets of leaves to go with the wood avens flowers, and it's those that I'm doing next.  I'd done two sheets of transfers for them, but they're smaller than some of the others, so I decided to iron them both onto the same piece of linen:


This has lead to a slightly odd layout, but never mind.

As they need to work with the existing flowersI'm doing them in the same shades of green, Madeira stranded cotton 1410 and 1411, though I'm also using the slightly darker 1412 in one place.

As usual, I started by buttonhole stitching around the edges, in the lighter shade, 1410:


As the leaves are quite a complicated shape, I needed to take extra care to keep the sawtooth edges nice and sharp.


As you can see, on the transfer the veins in the centres of the leaves are marked on; I stitched these in a single line of split stitch in the darkest shade, 1412.  To make sure the line was quite definite, I used three strands rather than the usual two:


And in close up:


With those in place, I can now fill in the rest of the leaves.

Tuesday, 2 November 2010

More ferns

The second sheet of ferns next.  I have to confess, I don't like doing them much.  They'll look fine as part of the overall design, but on their own they're a bit dull, and pretty tedious to do.  So I'll just say that I've done them, and leave it at that.

And here they are:


The next sheet is a bit more interesting, you'll be glad to hear!

Monday, 1 November 2010

North East Art Collective

I said the other day that I had some exciting news, and here it is: some of my work is forming part of the opening exhibition for a brand new gallery!


The North East Art Collective has only just opened, in Eldon Garden mall in Newcastle upon Tyne.  It features a wide and eclectic range of original fine art and prints, and some wonderful art craft, mainly glass, ceramics and some terrific wooden furniture.

All three of my Spirograph panels are included, along with two character cushions.  One of the panels was waiting to be hung when I went in earlier today, but here are the other two and the cushions:


Here's Spirograph I close up:


And Spirograph II:


I never did get a decent photo of that, so this is the first time you've seen it completed!  And finally, the cushions:


So what do you think?  John, the gallery owner, has done an amazing job against a very tight deadline, and I'm sure we all wish him the very best of luck with this new venture.

If you're ever in the centre of Newcastle, pop in!