Saturday 30 October 2010

Wood avens - petals and centres

I've finished the second sheet of wood avens.

After buttonhole stitching round the edges of the petals:


I added the first band of stitches in the palest shade.  I put more in than last time, to give a slightly more pronounced effect:


Then a band with one strand of the paler and one of the (slightly) darker colour:


Then finally finishing off the petals with split stitch using the darker shade:


Finally, I filled in the centres with French knots in green, and the darkest yellow I'm using on these flowers, a shade darker than the petals:


Here's the full sheet, completed:

Thursday 28 October 2010

More wood avens

Next, another sheet of wood avens.  There are just five on this sheet rather than six like before, so it should take a little less time to do.


Otherwise, it's the same as before.  Using Madeira 1410, I buttonhole stitched round the edges of the sepals (the green bits):


Then a band of stitches in 1410 around the edges:


Partial filling in with a thread formed from one strand of 1410 and one of 1411, to start the shading effect:


Then complete the rest with 1411:


Here's the full sheet:


Petals next!

Tuesday 26 October 2010

Finished ferns

Sorry it's been such a long time since my last post, I have been busy, honestly!  Actually, that's been most of the problem - I've been too busy.  Anyway, I'm back now, so I can start to bring you up to date.

To begin with, I've finished the first sheet of ferns.  Previously, I'd completed the buttonhole stitch around the edge; after that, I used the darkest green, Madeira 1412, to work a few stitches in the centres of the largest leaves:


This was followed by stitches using a thread formed of one strand of 1412 and one of 1411, both on the largest leaves and in the centres of the rest:


I then finished the leaves by filling in with split stitch in just the lighter shade, 1411:


(Sorry the background fabric looks a bit ripply, I forgot to take a photo until it was off the frame.)

So here are all the ferns on the sheet, completed:


They're a bit dull compared to the flowers, but they should work nicely as part of the overall design.

I should have some very exciting news for you in the next few days, so watch this space!

Tuesday 19 October 2010

Mountain Male-fern

The next sheet I'll be working on is of three ferns.  The design for these is based on mountain male-fern (Dryopteris oreades), though as they appear quite small on the Banner design, and unlike the pearlwort and wood avens flowers, they've been stylised to the point where they're not recognisable as any fern in particular.  In fact, as Fiona's design disappears into tiny leaves that look great as an image but would be impossible for me to stitch, cut out, and apply to a ground fabric, I've simplified them even further.

Here they are, transferred to the fabric:


I'm sure you can see what I mean - hopefully they should be recognisable as ferns, especially in the final version when the leaves will be a lot closer together, but they're generic ferns, rather than the mountain male-fern in particular.

Onto the stitching: this time, I'm using the two darkest shades of green in the Banner palette, Madeira stranded cotton 1411 and 1412.  I'll be using the darker shade in the centre of the leaves, where they join, so I used the paler of the two, 1411, to buttonhole stitch around the edges:


And a close-up:


These are simpler than the flowers, but a bit on the fiddly side!

Saturday 16 October 2010

French knots

Having completed the petals, I now need to fill in the space in the centre of each flower, and I'm going to do this using French knots.

From photos, the middle of the wood avens' centre area is a light green, surrounded by a darker yellow, so I'm going to use Madeira 1410, the lighter of the two greens I've already used here, and 0106, the next-darker shade of yellow from the ones I used on the petals.

Taking photos of stitching the knots was a bit tricky as ideally you need both hands for this (to keep the thread taut), and I was trying to hold the camera with one of them, but hopefully you can more or less see what I was doing.

The knots are going to be thickly worked to fill the entire space, so I brought the thread up at a random point within the centre area:


I then wrapped the thread around the needle, twice:


I was taught a long time ago that you should never wrap the thread more then twice around the needle to make a French knot; if you need a larger knot, use a thicker thread.

I then put the needle into the fabric close to where it came up, but don't yet take it through to the back.


I then pulled the thread, so that the loops around the needle are pulled tight, and are next to the fabric:


I then pulled the needle through to the back of the fabric; this takes the thread through the loops around the needle:


And forms the knot:


As I'm just using two strands, the knots are quite small, and I need a lot of them to fill the space, but they're quite quick to do.  I did all the green ones first, forming a cluster in the centre of each flower, with a few dotted around the edge:


I then filled in the remaining space with more knots in the yellow:


And in close-up:


And that's the first sheet of the wood avens finished!

Thursday 14 October 2010

Completing the petals

Last time, I was just concentrating on the largest of the wood avens, to demonstrate shading with split stitch.  I've now done the rest of the flowers' petals in the same way.

As most of the flowers are pretty small, I only worked a band of stitches in the lightest shade, 0104, on the next-largest flower, at the bottom of the sheet.  For the others (apart from the very little one, which is just in the darker shade), I did the first band in one strand of each colour; in the second-largest flower, I also worked a band of that, as the transitional stage:


I then finished the rest of the petals, using the darker of the two shades, 0105:


That's all the petals completed, but you can hardly have failed to notice a large space in the centre of each flower.  What's going to go there?  That's next!

Monday 11 October 2010

Split stitch shading

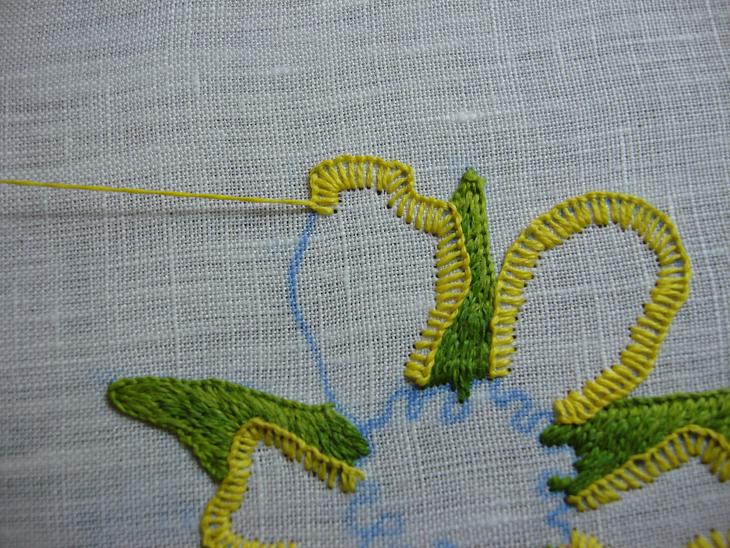
With the petals outlined with buttonhole stitch, I can now fill them in with split stitch.

Though there are other techniques for filling in an area with stitch and for shading with different coloured threads, with long and short stitch probably the most popular, I prefer split stitch.  To me, it can give a very fine degree of shading indeed over a smaller area than long and short allows, and can be used to quite subtle effect.  I also like the textured effect it gives, even when using a single colour.  I’ve used it a lot over the years, and it's one of my favourite stitches.

Split stitch seems to be most often used nowadays as a single row, used as an outline or a very fine line, as (depending on the thread you use) it's narrower than stem stitch or chain stitch.  It's very simple: the second stitch comes up through the first stitch, splitting it, which gives it its name.  While I use it in bands or blocks to fill in an area, the principle is exactly the same.

For the petals, I first worked a band of straight stitches out from the centre, at the base of each petal.  These are done using two strands of the palest of the three shades of yellow I'm using for this flower, Madeira 0104:


I want most of the petal to be in the middle shade, 0105, but going straight from one colour to the other is quite jarring, and doesn't give the soft effect that I want.  So, for a transitional band, I use one strand of the lighter colour, and one strand of the darker one:


In the photo, the effect is subtle to the point of invisibility, but they really are two different shades!  They weren't that much better in real life - I got the threads mixed up and it took me ages to decide which was which.  (And yes, I could just have cut new lengths and scrapped the ones I mixed up, but that would have been wasteful and I hate waste.  I use very last inch of thread, a habit I got from my grandmother.)

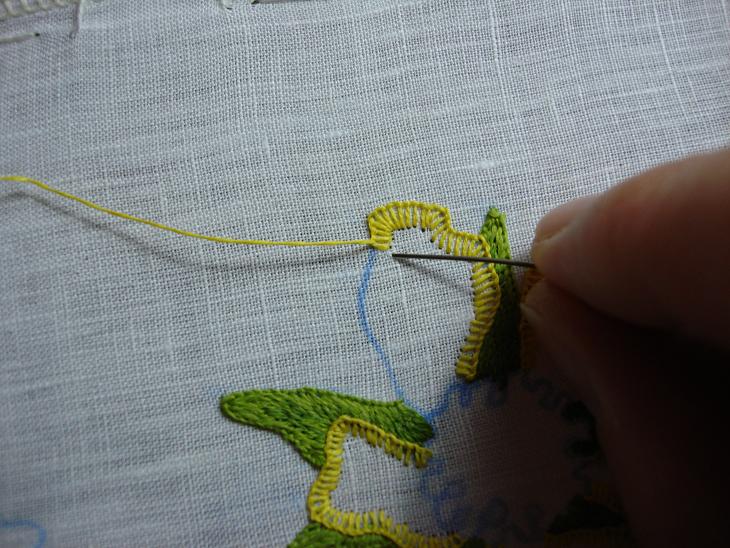
Anyway, once I'd sorted myself out, I stitched another band, using the one-strand-of-each thread.  This is very simple to do - I just bring the needle up through - or split - the stitch in the first band:


And take it back down again a little further in front:


Here's the flower with the pale and transitional bands in place.  Can you see a slight change in the colour?


Next, I used two strands of the darker colour, 0105, and worked the next band in exactly the same way with that:


Using this shade, I then filled in the rest of the petal.  Here's the flower with all of the petals completed in this way:


These two shades are very close together, so the effect is very understated, but I think worth doing. I used the two shades of green in the sepals in exactly the same manner, and even though they're next to each other on the shade card there's more of a difference between them than between the two yellows, so you can probably see how the effect works a little clearer on them.

For a transition of this sort I always use two colours next to each other on the shade card.  If the colour you want to head to is further away from the colour you started with than this, jumping straight from one to the other, even with one strand of each, can look harsh.  I always move through the intermediate shades, even if it means sewing bands of tiny stitches to get there.  Ideally, I should then end up with a seamlessly shaded effect, without it being obvious quite how it's achieved.

Saturday 9 October 2010

Buttonhole stitch

As I mentioned before, I'm using buttonhole stitch, or blanket stitch, to define and reinforce the edges of all the flowers, so that they can be cut out at a later stage.  With the petals of the first sheet of wood avens to do next, the first step is to buttonhole stitch around each of them.

I'm using three shades of yellow for these flowers: Madeira 0104, 0105 and 0106.  The bulk of the petals will be in the middle shade, 0105, so that's what I'm going to use for the buttonhole stitch.

The design outline is clearly marked on the fabric, and will be overstitched; to work the stitch, I start by bringing the needle up just on the outside of the design line:


I then put the needle back through the fabric a little way inside the line, and directly beneath where the thread came up:


I then bring the needle up outside the line again a little further along, but inside the loop of thread:


Pulling this tight gives an 'L' shaped stitch that goes over the design line; a series of them gives a row of overlapping Ls all the way around the edge:


And here are all the petals, buttonholed:


There are a couple of things to note: firstly, the buttonhole stitch 'legs' are going to be overstitched later with split stitch and so won't be seen; this means that I'm not being too fussy about the length of the legs.  If these stitches were going to be seen in their entirety in the finished piece I'd be a lot more careful with them, and would probably mark in a second line showing where the needle needed to go back down through the fabric each time, to help me maintain a consistent length.  The portion of the stitch along the edge, however, will be seen in the final thing, so I'm trying to keep the lengths of that part of each stitch as even as I can.  Once the split stitch is in place, that edging is all that can be seen of the buttonhole stitch, so that it doesn't look like buttonhole stitch at all, but more like stem stitch.  Have a look at the sepals - the green bits - that I've already worked to see what I mean.

Secondly, this is the simplest possible form of buttonhole stitch, and there are a wide range of more ornamental variants that you may wish to experiment with.  Here, the stitch is serving a practical purpose and isn't forming part of the design other than as a neat and unobtrusive edging, but the fancier forms of the stitch can be very pretty in their own right.  Sharon B's Dictionary of Stitches shows all sorts of things you can do with it.

Wednesday 6 October 2010

Green sepals

The green bits on the wood avens are far bigger and more pronounced than on the pearlwort flowers, so need a bit of shading to give them life.

Previously, I'd buttonhole stitched round the edges of all six flowers on the sheet in the lighter of the two shades I'm using.  I then worked a band of stitches in the same colour around the edges and at the ends of the sepals:


And in close up:


Most of these flowers are pretty small, with the smallest less than an inch (2.5cm) in diameter, so there's not much room for shading there.  Some of the smallest green sections are therefore just in the lightest green thread, but where I had a bit more room I introduced some shading:


In close up again:


That was enough to complete most of them, but with the largest flower, I was able to add a bit more, taking it down to the darker shade:


I think this works quite nicely, giving an effect of the petals casting a shadow.

The largest flower on this sheet, the one on the top right, is the biggest flower appearing anywhere on the entire Banner.  As such, this seems the best place to demonstrate the techniques I'm using in more detail, so in the next couple of posts, I'll show you buttonhole stitch and split stitch shading as I start the petals.

Monday 4 October 2010

Wood avens

The next sheet I'm going to do is of wood avens (Geum urbanum). Wood avens, also called herb bennet, is a pretty flower with yellow petals and pronounced green sepals.  Visually, it has rather more going on than the pretty but rather plain St John's-wort/pearlwort I've just done, so has a little more opportunity for shading and contrast.

I've got two sheets of these to do for the bottom panel; here's the first one with the transfer ironed onto linen, which has then been mounted onto the frame:


I'm using exactly the same repertoire of stitches as before, and also as before, I'm doing the sepals - the green bits - first so the petals will overlap them.  I'm using two shades of green for the sepals, Madeira stranded cotton numbers 1410 and 1411, and buttonhole stitched round the edges of the six flowers on the sheet with the lighter of the two, 1410.


In close up:


They're going to be paler round the edges, shading into the darker colour towards the centre.  I'll be doing that in split stitch next.