The time has come to start putting all the pieces together and make the Banner up. I'm doing the back first; it's important to get it right, of course, but I feel I have a bit more leeway than with the front, so I can get a bit of practice in.
As a reminder, the design calls for a central cross (front and back), with a wide red border. Here's the cross that'll form part of the Banner back:
I made a paper pattern the actual size of the central section, without any seam allowance. I marked it into quarters, to show the centre and mid points of each edge, so I could line it up correctly, with the cross centred and the edges square on the grain of the fabric:
Using tailor's chalk, I marked around the edge, where the seams will go, and the centre of each side:
You can't tell from the photo - in fact, it was pretty hard to tell in real life! - but I tacked over the markings both to hold the shape in place and to transfer the marked out edges onto the back, too.
I then cut this out with a seam allowance, and edged it with the overlocker:
I did the same with the four red velvet panels that will form the border. As the panels are plain I didn't have to centre anything, though I did take care that the top and bottom edges were straight:
It's a bit easier to see the tacking stitches this time!
Here it is cut out and edged:
I then tacked the first panel to the central cross:
If you look closely, you can see arrows marked on the linen lining. Velvet needs to keep the grain all going in the same direction or each piece will look an entirely different colour, and I don't want it appearing to be in a variety of reds. The arrows show which way up each panel needs to go, to keep everything going in the same direction.
So, machine stitched in place:
And the two sections joined together:
I did the same with the other three side panels, joining them to the central cross:
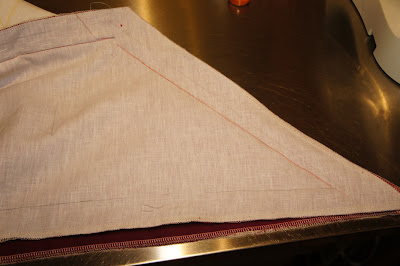
Now the really tricky bit: the mitred corners joining the side panels to each other. I pinned them carefully:
Tacked them (though that's very hard to tell here, I'm afriad), and marked a nice clear line in red pencil to machine along:
I couldn't get the foot of the sewing machine right to the top, so I'll need to put the last (or first) few stitches next to the central panel in by hand later.
So, I machine stitched that and the other three corners, and...
Success!
It's such a relief that it all worked ok, especially with the front of the Banner still to do. I can be quite confident now that it'll all turn out as it ought, though, which is a load off my mind!
There's still quite a bit of finishing work to do on the back first, though, and I'll tell you how that goes next time.
(Also, a big thanks to my mum, partially seen above holding it up, who came round and helped with moral support and cups of tea on what was rather a nerve-wracking day. Thanks mam!)
Subscribe to:
Post Comments (Atom)


yummy! (has this appeared twice? the comment form is being funny). Double yum, then!
ReplyDeleteThanks for the advice above, too. The time will come when I'll be putting something together like this....
I can just imagine how nerve wracking that must have been. You were smart to start on the back, it will make the front that much easier. This is really an exciting phase of the project. I hope you will be able to embroider your name somewhere on it, maybe on the inside of the panel.
ReplyDeleteThe front is also that much scarier! I do have plans to add my signature on the inside, so watch this space.
ReplyDeleteYes, I can imagine that if you had a hundred backs to pratice on, the front would still be much scarier. Good job on the back, though.
ReplyDelete